The GIGABYTE Aorus AX370-Gaming 5 Review: Dual Audio Codecs
by Gavin Bonshor on November 14, 2017 12:30 PM EST
Today we are having a look at a LED-laden, gaming-focused, ATX motherboard from GIGABYTE: the Aorus AX370-Gaming 5. If a user wants LEDs for Ryzen at under $200, here is one of the primary contenders. Being part of GIGABYTE's gaming product line means we get SLI support, and GIGABYTE is using a gaming-focused network controller (one of two) and some overclocking options for the processor. The interesting part of this board, however, is the use of dual audio codecs: one for the rear panel and one for the front panel. To physically do this requires a couple of compromises, so we have put the board through its paces to see if it is worth buying.
Other AnandTech Reviews for AMD’s Ryzen CPUs and X370/B350
The AMD Ryzen 3 1300X and Ryzen 3 1200 CPU Review: Zen on a Budget
The AMD Ryzen 5 1600X vs Core i5 Review: All Ryzen 5 CPUs Tested
The AMD Zen and Ryzen 7 Review: A Deep Dive on 1800X, 1700X and 1700
To read specifically about the X370/B350 chip/platform and the specifications therein, our deep dive into what it is can be found at this link.
Planned Reviews
- $260 - ASRock X370 Professional Gaming
- $230 - ASRock X370 Taichi
- $175 - GIGABYTE AX370-Gaming 5 [this review]
- $120 - ASRock B350 Gaming K4
- $110 - Biostar X370GTN [review]
- $98 - MSI B350 Tomahawk
The GIGABYTE Aorus AX370-Gaming 5 Overview
The GIGABYTE AX370-Gaming 5 shows that not every motherboard has to conform to the regular gaming themed combination of black PCB with red or silver aluminium heatsinks. With the Gaming 5, it has a wave of black and white contrasting heatsinks featured across the board. GIGABYTE has opted to implement a fairly standard X370 PCIe layout consisting of two full-length PCIe 3.0 slots powered by the CPU, which feature support for dual graphics card configurations on either SLI or CrossFire and have additional rigidity support. This is in addition to a single full-length slot present at the bottom which operates at PCIe 2.0 x4 also with rigidity support, and three PCIe 2.0 x1 slots.
It gets a little interesting when we start discussing the controllers. Powering the onboard audio are a pair of Realtek ALC1220 codecs, with one dedicated for the back panel and one specifically for the front. Very few boards (if ever?) have had this arrangement, making the Gaming 5 special in that regard. The audio comes bundled with SoundBlaster’s X-Fi MB5 software utility. For networking, the primary port is derived from the gaming-focused Killer E2500 Gigabit controller, and a second from an Intel I211-AT controller.
Featured is a 10-phase power design, which GIGABYTE aims for solid and consistent power delivery, and claims it is useful for overclocking. It is worth noting that the VRM is split into a 4+2 design with the phases dedicated to the SoC using a doubler to give an 8+2 phase design overall.
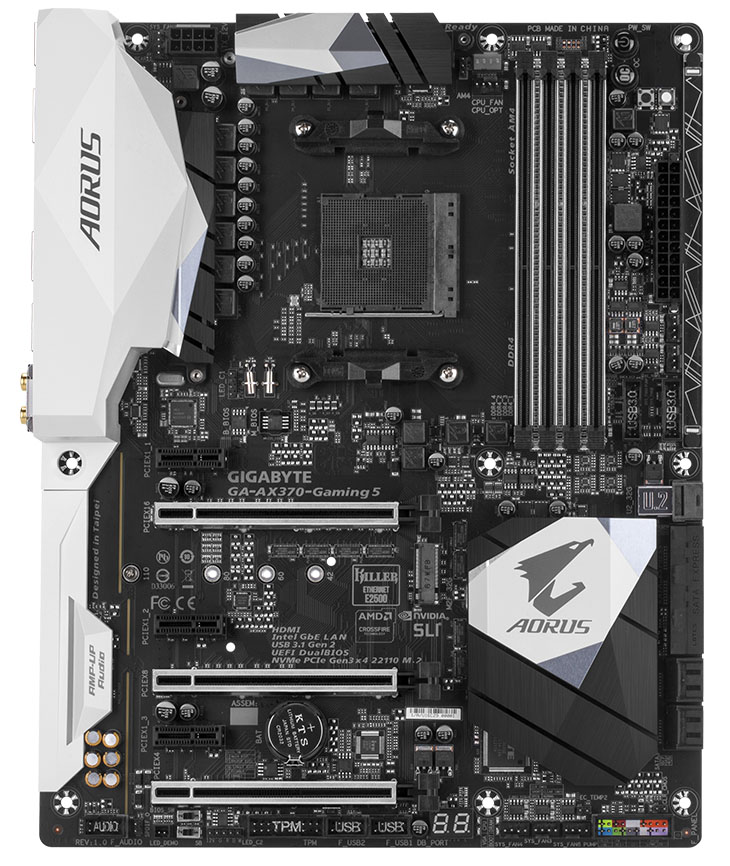
Storage wise, the Gaming 5 has eight SATA 6Gbs ports which are accompanied by two SATA Express ports. PCIe storage comes via a single U.2 port, which shares bandwidth with a single M.2-2280 slot found between the first two full-length PCIe slots.
Performance on the Gaming 5 essentially matches what we see on the other X370 boards. Despite the dual audio codecs, this means that each codec only has half of the space, so our audio results show that it is one of the weaker ALC1220 solutions (although better than the ALC892 units we have tested). Power consumption at idle was within a couple of watts of our other boards despite the LEDs, and at load the system actually drew 15W less than our other tests, to which we're still looking into an explanation. Overclocking, as explained below, was relatively easy.
The Gaming 5 sits near the top of the pile of GIGABYTE's current X370 offerings, with the only model above it being the AX370-Gaming K7. It is also worth noting that GIGABYTE's X370 range stops just short of $200 even with their top AX370-Gaming K7 model; with the very similar AX370-Gaming 5 which this review is actually on coming in at $184 (at the time of review).
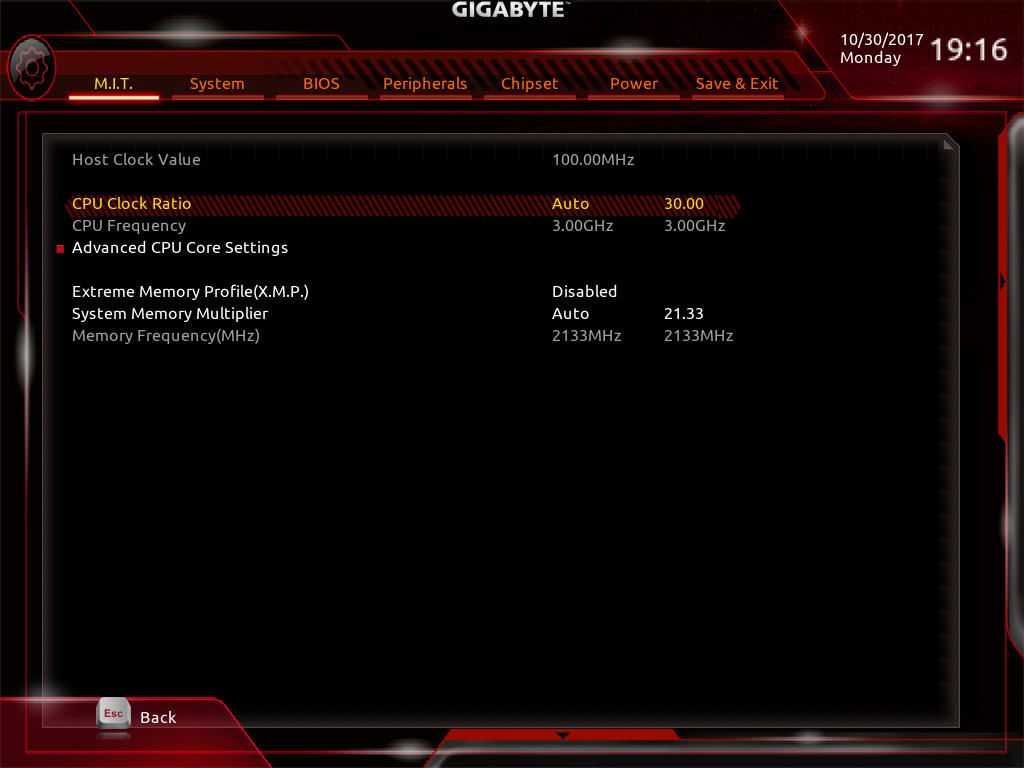
Overclocking
Most, if not all, mid-range motherboards are very capable of overclocking the processor, and most include a one-click OC button (either physical or in the BIOS) which gives the task to the motherboard based on how far it believes it can be done safely. The only caveat of this is that virtually every motherboard I have used this with is very cautious about not giving enough voltage, so over-volts the CPU. This gives the overclock more chance to remain stable, but plays havoc for little gains at the price of extra energy lost as heat; thermal sensors can start to kick in even if the auto-option is safe. With the Gaming 5, both automatic overclocking and a manual overclocking is available.
Methodology
Our standard overclocking methodology is as follows. We select the automatic overclock options and test for stability with POV-Ray and OCCT to simulate high-end workloads. These stability tests aim to catch any immediate causes for memory or CPU errors.
For manual overclocks, based on the information gathered from previous testing, starts off at a nominal voltage and CPU multiplier, and the multiplier is increased until the stability tests are failed. The CPU voltage is increased gradually until the stability tests are passed, and the process repeated until the motherboard reduces the multiplier automatically (due to safety protocol) or the CPU temperature reaches a stupidly high level (100ºC+). Our test bed is not in a case, which should push overclocks higher with fresher (cooler) air.
Overclocking Results
Referencing back to the Biostar X370GTN review, our Ryzen 7 1700 CPU does have a limitation between 3.9GHz and 4.0GHz; at least on the boards we have tested thus far. This is down to silicon lottery and a combination of a sharp ramp of voltage to temperature when moving up each different step; therefore, cutting out/throttling due to thermal limitations when pushed too far on ambient cooling.
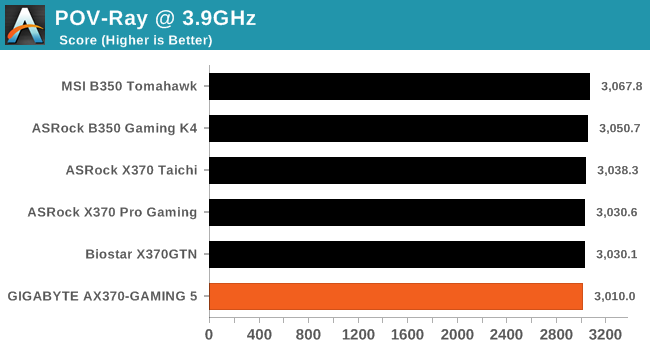
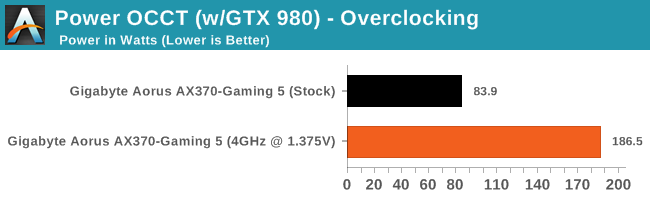
The Ryzen 7 1700 processor we are using has a 3.0 GHz base core clock speed and a 3.7 GHz turbo, and is rated at 65W. When overclocked to 3.9 GHz with 1.375v, the overall power consumption taken at the wall was pushing just under 187W at peak.


34 Comments
View All Comments
khanmein - Tuesday, November 14, 2017 - link
Why not using Handrake v1.0.7?PeachNCream - Tuesday, November 14, 2017 - link
That's probably so benchmark results are can be compared with previous reviews.IGTrading - Thursday, November 16, 2017 - link
Thank you for the good review.I also think there should be some USB transfer tests and LAN NIC tests as well.
Nothing too complicated, just large file transfer speeds, photo files and a set of small diverse files.
And maybe we should throw a comparable Intel setup in there, just to see how how the chipsets compare while handling the USB and LAN transfers, BOOT speeds, etc.
ayqazi - Tuesday, November 14, 2017 - link
I can't actually understand why you would have 2 audio codecs... or perhaps this is a case of "if you have to ask what it's for, you don't need it"HollyDOL - Tuesday, November 14, 2017 - link
The use cases are super rare, but still might come in handy. I use the machine as a terminal for two users (with added Aster software layer), each has own audio, so it's possible each user has complete experience, being able to use speakers or headset etc.Lord of the Bored - Tuesday, November 14, 2017 - link
Honestly, for an admittedly super-rare use case, I would just tell people "install a sound card if you want a second set of DACs". God knows there's enough slots for it.Samus - Wednesday, November 15, 2017 - link
The ridiculous thing is taking up real estate or a second Codec when one can be added via USB for $10.HollyDOL - Wednesday, November 15, 2017 - link
Actually that's exactly what I do, dedicated card plays better anyway :-)milli - Tuesday, November 14, 2017 - link
Did you read the review?One is dedicated to the back and one to the front.
If you didn't know, these audio codecs don't have the same quality output over all channels and usually the front audio quality takes a hit. Hence the dual codec arrangement.
Hixbot - Tuesday, November 14, 2017 - link
Isn't everyone these days just using digital audio output. Better to Bitstream to a quality dac, no need for on board dac, especially two of them