Cambridge SoundWorks DTT 3500 Digital 5.1 Surround Speaker System *UPDATED*
by Jim Warren on December 23, 2000 4:00 AM EST- Posted in
- Smartphones
- Mobile
 More
Setup
More
Setup
Putting together the multitude of parts from the system takes some time, though the final result is worth the time and effort. Included with the package are a number of stands for mounting the speakers, and since the wiring becomes integrated into the stands, some decisions on placement must be made before assembly. There are two options for placement of the center channel - one angled down for placement on top of a monitor, and the opposite angled for placement beneath the screen. The four satellites are interchangeable with desktop stands included for all of them or tripod stands for the rear channels that appear to be the same ones included in earlier speaker packages from Cambridge SoundWorks.
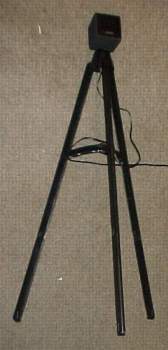
The desktop stands are straightforward - they slip into slots on any of the four satellite speakers. The rear tripod stands definitely have "some assembly required," as they consist of a number of plastic parts that must be snapped together. They are not the strongest stands; with little mass, the only thing that keeps them upright is a large footprint. In a crowded room, their floor space requirements are excessive. They require a large amount of space as compared to the size of the speaker they are supporting. A weighted base and single upright support could have offered a comparable solution without taking up the real estate these do.
 |
 |
After choosing the stands for each satellite speaker, the wire must be fed through the stand and then connected to the speaker before it is placed on the stand. The end result is that the connection to the speaker is hidden by the stand, which is great for presentation, though it could make troubleshooting difficult. The larger center speaker has a different bracket design from the satellites, which allows access to the connections even while mounted.
 For
connecting the speakers to the amplifier, four 3 meter cables are included for
the front surrounds, sub, and center channels, while two 5 meter cables are
included for the rear surrounds. The length of the front cables are sufficient
for placement on the desktop, though the rear wires would not stretch across
a large room; they limit the listening environment to a smaller range, though
a range that is suitable to the magnitude of the system. In an attempt to help
the user keep all of the connections straight during assembly, included are
labels for the wires and speakers to prevent having to trace wires during troubleshooting
or assembly.
For
connecting the speakers to the amplifier, four 3 meter cables are included for
the front surrounds, sub, and center channels, while two 5 meter cables are
included for the rear surrounds. The length of the front cables are sufficient
for placement on the desktop, though the rear wires would not stretch across
a large room; they limit the listening environment to a smaller range, though
a range that is suitable to the magnitude of the system. In an attempt to help
the user keep all of the connections straight during assembly, included are
labels for the wires and speakers to prevent having to trace wires during troubleshooting
or assembly.
The 22 AWG wire connects to the speakers via a standard spring terminal at the speakers, and a RCA connection to the amplifier. For anybody looking for more length on the cables, some minor soldering would be involved to create longer cables. Both the gauge and length of the cables is appropriate for a system that only pushes 7 watts per channel, as the speakers can't be too far apart at that power, and heavier wire would not be needed at those power levels.
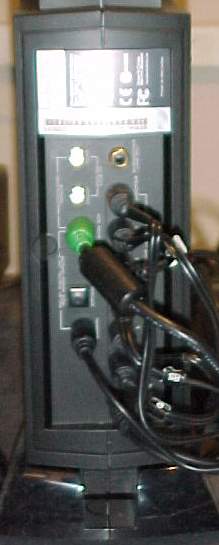
Before the decoder/amplifier unit is installed, the user is offered a choice between horizontal and vertical orientation. Two different faceplates ensure the labels for the controls are readable in either situation, and a base is included for vertical orientation. On a crowded desktop, the vertical option is a good idea, though it does place the volume knob at the very bottom of the unit.
Before making the next set of connections, you'll need to choose which input to use for the computer or other devices and run the necessary wires. For digital connections, wires are included for all three interfaces. For owners of a SoundBlaster Live! card, Creative's proprietary digital DIN connection is made through two cables. One short cable adapts the digital minijack on the SB Live! to the DIN connection, and the other is an extension to get to the amplifier. For coaxial connections, included is a single RCA cable for connection to a Live! Drive, digital daughtercard, hardware based DVD decoder, or any other coaxial SPDIF connection. Finally, an optical cable is included to take advantage of connections to consumer audio devices, DVD players, or gaming systems.
Analog connections are via 1/8th inch minijacks. For four channel audio cards, there is a tandem minijack cable for connection to the front and rear speaker outputs. Also included is a stereo RCA to minijack cable for connection to the analog connections on consumer audio devices or gaming systems. It's unfortunate that analog connections are not available to the center channel or subwoofer as more and more 6 channel audio cards are available now to access these directly. But with its own decoder the system still offers full Dolby Digital decoding for surround sound.
The final connection is the external power supply. The AC to DC converter is an inline design, meaning that there is a tail that connects to the wall and a tail that connects to the decoder/amplifier. Though this is somewhat necessitated by the size of the adapter, it is still a strong decision to have avoided a "wall wart" design that eats up real estate on a power strip or outlet.
Once everything is wired up, placing the speakers is all that is needed before sitting back to enjoy the sound. The speaker placement is standard for a small 5.1 surround sound system. The front left and right satellites are placed to each side of the visual source, a monitor would be the most common. The center satellite is then either placed on top of or beneath the visual source for vocal localization. In the case of the DTT 3500, there are two stand options to angle the speaker towards the sweet spot. Finally, the rear satellites should be placed behind the listening position with an equal separation for even stereo image. Their height should be equivalent to that of the front satellites, which is easy to accomplish with the included stands. The subwoofer can be tucked under a desk or against a wall, where the bass will be emphasized due to the acoustical nature of the corners.
After this extensive setup, it was time to sit back and listen. Keep reading for what the system could do.


0 Comments
View All Comments