Original Link: https://www.anandtech.com/show/6902/msi-z77agd65-gaming-review
MSI Z77A-GD65 Gaming Review
by Ian Cutress on April 18, 2013 12:00 PM EST- Posted in
- MSI
- Motherboards
- Z77
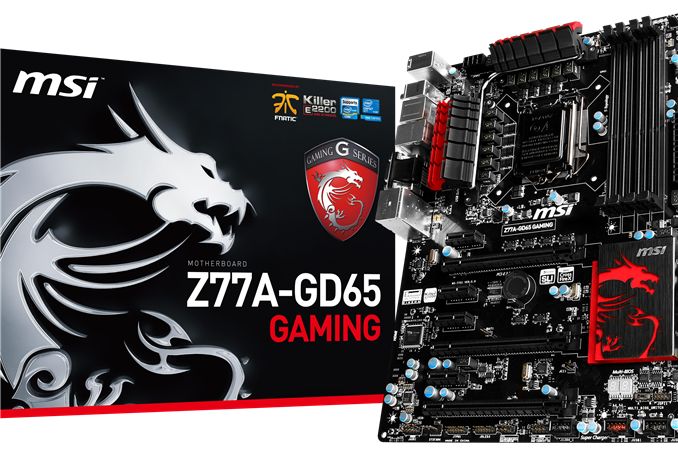
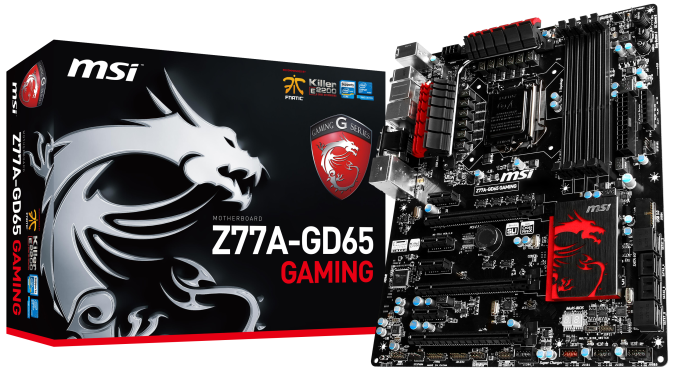
In recent motherboard generations, the ‘in style’ thing to do is to separate the SKU line of a company into several compartments – channel/mainstream, overclocking, budget, smaller-than-ATX, X feature enabled (such as Thunderbolt), and gaming. The latest addition to the gaming scene is MSI, who have recently released their Z77 Gaming range, despite being a stones throw away from Haswell launch.
So when a reviewer comes across a product designated ‘gaming’, we are clearly wanting to see and feel why it is a gaming product. This would mean specific features aimed at the gaming crowd, to help reduce lag, boost frame rates, and increase the experience of the whole package. We already have contenders in this space aside from MSI – ASUS has their Republic Of Gamers range which we have rated very highly, Gigabyte has the G1 range, and ASRock wheels out Fatal1ty. Off the back of CeBIT 2013, MSI have launched four gaming boards in the Z77 range: the Z77A-GD65 Gaming, the Z77A-G45 Gaming, the Z77A-G43 Gaming and the B75A-G43 Gaming.
These motherboards come off the back of a successful gaming laptop range for MSI. In the wake of the global depression, every motherboard manufacturer needed to diversify its portfolio in order to cover itself, and MSI did this in the notebook arena. The gaming notebooks feature a red and black color scheme, which seems to be the going rate for gaming product lines:
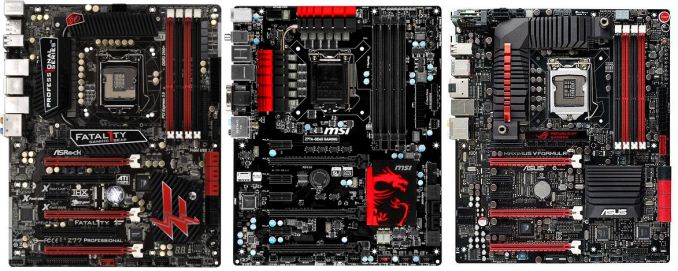
From left to right – ASRock Fatal1ty Z77 Professional, MSI Z77A-GD65 Gaming, ASUS Maximus V Formula
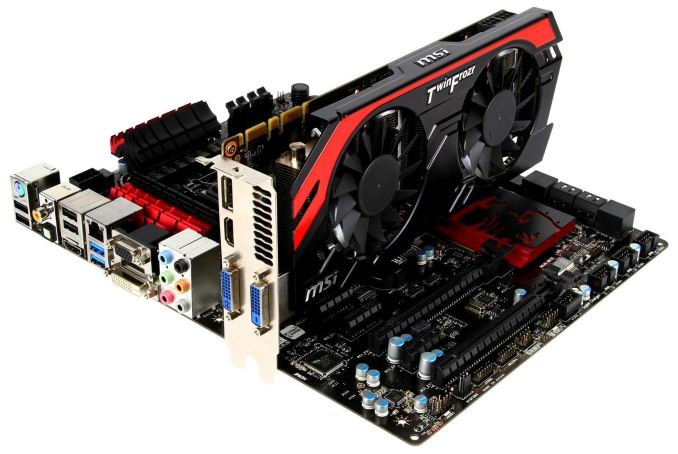
The only company that bucks this trend is Gigabyte, aiming for a gaming green instead, or orange for the overclocking range. MSI aim for yellow with their overclocking range – the MPower and Lightning GPUs being the prime examples (the XPower is still relatively undefined in the blue end of the spectrum). However MSI is tying their ranges together, at least in color scheme – the Gaming range will have GPUs featuring a red Twin Frozr 4 cooler, and there have been a lot of images online featuring these two with red-LED Avexir memory.
While MSI have had great success of their GPU lines (the Lightning range constantly breaks overclocking world records and is more often than not the fastest pre-overclocked version of each card), the motherboard range needs a boost. MSI is aimed primarily low to mid-range, as seen by the lack of a Z77 PLX 8747 enabled motherboard in the lineup for three-way and above – even the GD80 and MPower are non-PLX. Thus if they want to release a gaming motherboard, gamers will want the best available, especially if they have that extreme setup. The Z77A-GD65 Gaming, despite being the top of the range so far, is the one we are reviewing today. It hits the line down the middle, going for that single and dual GPU gamer, but given how close we are to Haswell, was it worth the effort?
MSI Z77A-GD65 Gaming Overview
Speaking to MSI Europe, the reason for releasing a Z77 Gaming product line was due to the Haswell delay. They have had plans for a Z87 Gaming range since they got the specifications through for Haswell, but the additional 4-6 month delay means that the gaming range was brought forward. The only issue was that the gaming range on Z87 will have a different naming; the Z77 gaming range is a naming hybrid for now.
One of the first thoughts that popped into my mind when I started this review is ‘this looks like a normal GD65’. There are a large number of similarities:
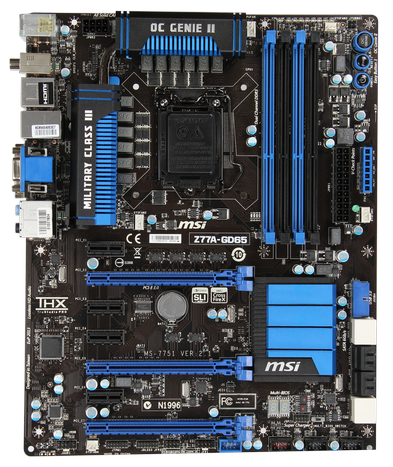
In actual fact, we are dealing with almost the exact same layout. Same number of SATA ports, same VRM configuration, same location for OC buttons, USB ports, voltage check points, fan headers, the lot. The difference it seems is in the ‘gaming details’.
Over the base GD65 model we get a Qualcomm Atheros Killer NIC E2205-B gigabit Ethernet controller, a regular feature on the MSI Gaming notebook range. This NIC is designed to offload network features, such at packet priority, onto the NIC itself rather than the CPU, as well as bypassing the Windows network stack for high priority applications. Most motherboards now offer some form of network management tool, however these usually require CPU intervention in order to keep everything in the right order. While I cannot say that a Killer NIC is vital in improving FPS or response times, it could help reduce the ‘user’ end side of the lag in gaming. Though if you are suffering from lag due to your own computer, turn off downloads, Facebook and updates during competitions.
Similar to ASRock’s Fatal1ty range, the MSI Gaming also has a ‘Gaming Device Port’, which should allow for higher polling rate mice (500-1000 Hz) to be used. Whether a higher polling mouse rate is useful is still debatable depending on the frame rate – if you are polling up to 16-32x more than the FPS of the game, the PC has to decide on the average acceleration and location vs. the latest acceleration/location and inject it into the gaming stream appropriately.
Aside from these two features, our expectations of a gaming motherboard in terms of hardware actually fall fairly short, no matter how much marketing material from Fnatic (the gaming team used to help promote the hardware) is produced. There is a clear line between marketing bumpf and actual useful features, and the bumpf is best left to press releases. A dragon image on the motherboard is not a feature; it is a design tool to add only aesthetic quality, not actual performance or connectivity. Almost all the other features on board are identical to the standard GD65 - Military Class III, OC Genie, overclocked memory, fan controls, Click BIOS II, Super Charger and voltage check points. As a gaming board, I would have expected an improved audio codec for one – the GD65 Gaming sits on a Realtek ALC898 with no additional hardware to improve audio, despite having a Sound Blaster Cinema license and software.
I may be judged for being too critical; if I saw a GD65 and GD65 Gaming side by side, I know what the differences are: software visuals, Killer NIC vs. Intel 82579V, and a Gaming Port. Do these differences make it a proper gaming motherboard, or just an iterative update? I would expect a gaming motherboard to have a lot more features – support for chipset water cooling, a better audio codec, another NIC, gaming WiFi, more overclocking features, LEDs under the heatsinks, anything. It also seems odd to include three of the four supported video outputs on the rear IO when this is an ATX motherboard aimed at gamers. All MSI needed was a HDMI if any gamer wanted to use the IGP.
Performance wise, the GD65 Gaming is a typical Z77 motherboard. MSI have enabled MultiCore Turbo for processors when XMP is enabled which gives it the edge at stock over non-MCT enabled boards, though efficiency against similar ASUS and Gigabyte boards is still lacking in certain parts. Overclocking was straight forward, although aside from OC Genie, MSI really need to supply a set of automatic overclock options, not just one, in order to be considered for awards. The one big plus in the system is Live Update 5, the software MSI use to help users update motherboard drivers and software. No other manufacturer offers something as good as this, though there is room for improvement.
The Z77A-GD65 has retailed for $150-$165 at Newegg.com this week, and the Gaming needs to be around that price, perhaps +$5, to justify its position. At $175+, the extra green would be better suited on other upgrades.
Edit: Current price on Newegg is $180. It seems that style adds in cost, or manufacturers/etailers want more margin.
Visual Inspection
The MSI Z77A-GD65 Gaming is here to promote MSI’s foray into the gaming hardware industry; alongside the laptops we have a design theme and a culture in the form of the ‘MSI Dragoon Army’. This is of similar ilk to the Republic of Gamers from ASUS, with separate forums and community. Similarly in style to hardware is the color scheme, which offers red and black but also a Dragon motif on the motherboard. Someone should inform MSI that a Dragoon is technically light mounted cavalry, or in the case of several RPGs such as Cid from FF7, infantry specializing in the killing of dragons. In the latter context, it may make sense if the person specializing in the killing of dragons would exhibit a dragon motif on their hardware.
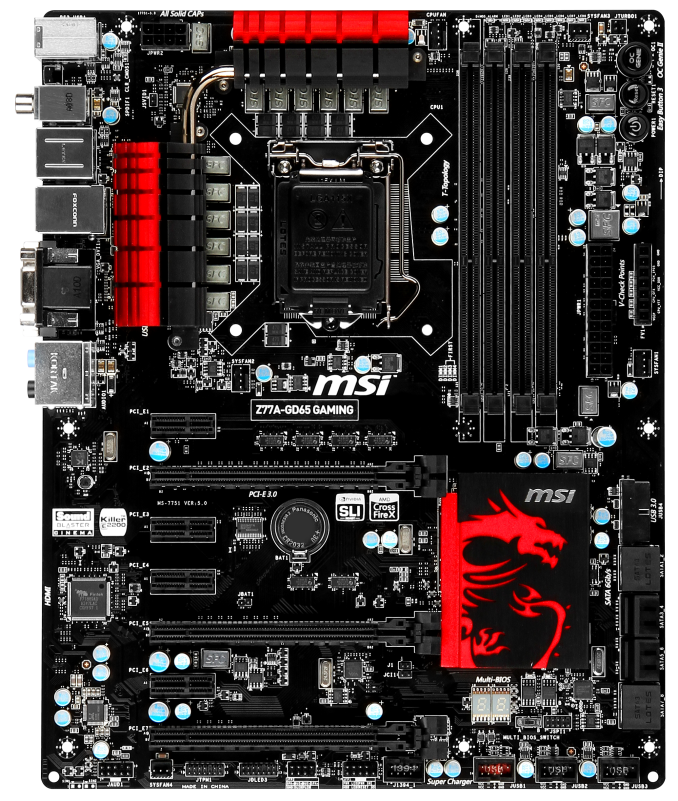
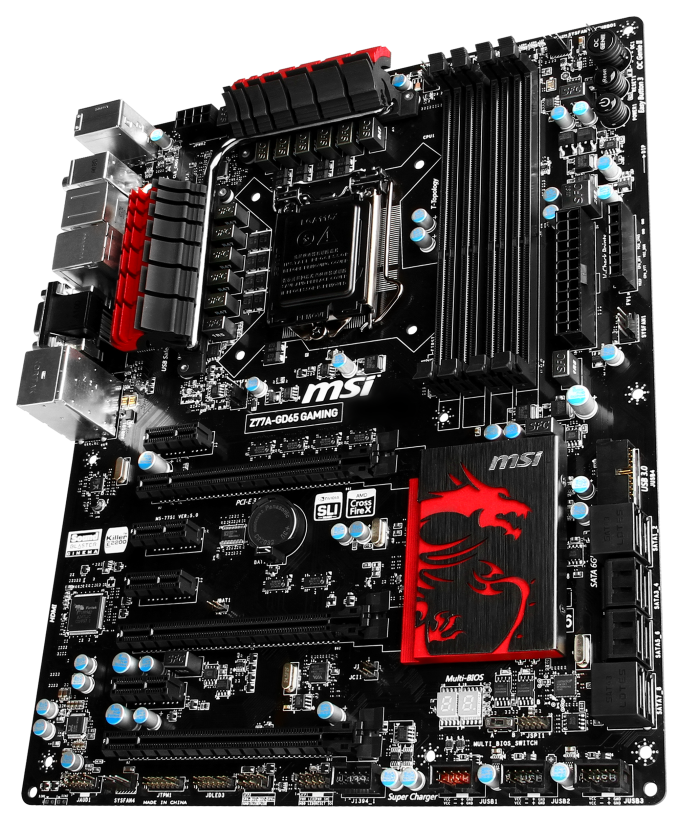
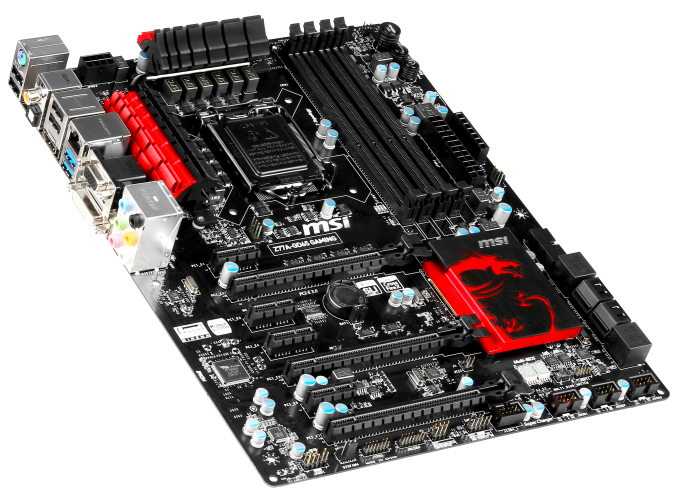
The Z77A-GD65 Gaming, as mentioned earlier, an essentially a copy of the normal GD65. The socket area conforms to Intel specifications, with the power delivery and super ferrite chokes covered in a conjoined heatsink above and to the left of the socket. The heatsink is 28mm above the PCB, and uses curved fins in the shape of a dragon to increase surface area for heat transfer.
The CPU has a single 8-pin 12V connector for power, and has access to four fan headers within easy reach. The CPU 4-pin is just above the socket between the heatsink and memory, and a 3-pin SYS fan in the top right on the other side of the memory. A 4-pin SYS fan is below the socket above the first PCIe x1 slot, and another 4-pin is center-right on the board beside the 24-pin ATX power connector. The board has one other fan header, a 3-pin SYS fan on the bottom left of the board next to the front panel audio.
Moving around the motherboard in a clockwise direction, and our memory slots are all black but with a diagram beside them to tell the user which ones to populate first. Unfortunately these are not the single sided latch memory slots we have become accustomed to on high end motherboards. We also see writing on the motherboard saying ‘T-Topology’, referencing how the memory channels connect to the IMC of the processor in a way that should increase peak memory clocks when all memory slots are populated. T-Topology was designed as an incremental update for Haswell, however ASUS were first to jump the gun with their initial Z77 launch – it now seems that the other motherboard manufacturers are following suit.
Above the memory slots are a set of LEDs to let the user know how many of the CPU phases are in action at any one time – an option to turn these lights off comes with the MSI software. Continuing clockwise and we get to our Power/Reset buttons, along with an OC Genie button. The power and reset buttons are a similar height and shape to each other, meaning the errant overclocker may accidentally press the wrong one; I would urge MSI to offer different shapes for these buttons, or to put one each side of the OC Genie button. We cover the OC Genie button usage in our overclocking section later in the review.
Below the power/reset buttons are the 24-pin ATX power connector, with a set of voltage check points and 4-pin fan connector alongside. The voltage check points are a regular feature on MSI motherboards, allowing users concerned about real voltage numbers under extreme overclocking scenarios to check values accurately rather than via software.
Our USB 3.0 port, powered by the chipset, is above the SATA ports, as well as right angled with respect to the motherboard. As with the base GD65, this is an odd configuration, supported more by cases that are deeper – if you already have trouble getting the SATA cables to fit, the USB 3.0 connector will also be an issue. Normally a manufacturer would put the USB 3.0 where the voltage check points are on the MSI, but as a result MSI have to move it down the board and place it at this angle due to its proximity to the first PCIe slot. Note that this is not an extra USB 3.0 controller, this is just one provided by the chipset, meaning four USB 3.0 ports overall on the motherboard. The SATA ports consist of the two SATA 6 Gbps from the chipset, four SATA 3 Gbps from the chipset, and two SATA 6 Gbps from an ASMedia 1042 controller.
Just beside the SATA ports and below the chipset heatsink is a two-digit debug display, which handily doubles as the CPU temperature readout after booting. This is a feature I quite like and I wish more motherboards had it! Beside this is a multi-BIOS switch, allowing users to switch between the two soldered BIOS chips on board.
Along the bottom of the board is the usual state of affairs with headers, identical in fact to the GD65 layout. From right to left we have three USB 2.0 headers (the one in red being the SuperCharger enabled header), a FireWire/IEEE1394 header, the front panel header, a TPM header, a 3-pin fan header, and the front panel audio header.
The PCIe layout is standard for a motherboard in this price bracket – from top to bottom we have a PCIe x1, x16 (x8 when more than one GPU is installed), x1, x1, x8 (x4 when more than two GPUs are installed), x1, and x4. This final x4 is CrossFireX and SLI compatible for Ivy Bridge processors but disabled for Sandy Bridge. As demonstrated in previous reviews, at three-way GPU setups, having an onboard PLX chip makes sense as frame rates would be slightly better.
The rear IO is one of the critiques I have with this motherboard – as a gaming motherboard, one would expect users to be using a discrete GPU. Now there is scope to use Lucid Virtu MVP in the setup, though I would be interested to know the number of gamers, especially members of Fnatic, which use Virtu MVP. But even still, a single video output would be sufficient for this, rather than HDMI + DVI-D + VGA. Even with these three, there does exist DVI-D + VGA combination ports (DVI-I in fact), which would then allow the HDMI port to be migrated above the DVI-I, and space for a couple of extra USB 2.0 ports. There is a lot of scope for rear IO, but only a few manufacturers actually optimize it.
Nevertheless, from left to write we have a combination PS/2 port, two USB 2.0 ports which are Gaming Device Port enabled, a Clear_CMOS button, optical and digital SPDIF outputs, two more USB 2.0 ports, a HDMI port, the Killer NIC port, two USB 3.0 ports, VGA, DVI-D, and the set of six audio jacks.
Board Features
| MSI Z77A-GD65 Gaming | |
| Price | Link |
| Size | ATX |
| CPU Interface | LGA-1155 |
| Chipset | Intel Z77 |
| Memory Slots |
Four DDR3 DIMM slots supporting up to 32 GB Up to Dual Channel, 1066-3000 MHz |
| Video Outputs |
VGA DVI-D HDMI |
| Onboard LAN | Qualcomm Atheros Killer E2205 |
| Onboard Audio | Realtek ALC898 |
| Expansion Slots |
3 x PCIe 3.0 x16 (x16, x8/x8, x8/x4/x4) 4 x PCIe 2.0 x1 |
| Onboard SATA/RAID |
2 x SATA 6 Gbps (Chipset), RAID 0, 1, 5, 10 4 x SATA 3 Gbps (Chipset), RAID 0, 1, 5, 10 2 x SATA 6 Gbps (ASMedia), RAID 0, 1 |
| USB |
4 x USB 3.0 (Chipset) [2 back panel, 2 onboard] 10 x USB 2.0 (Chipset) [4 back panel, 6 onboard] |
| Onboard |
4 x SATA 6 Gbps 4 x SATA 3 Gbps 1 x USB 3.0 Header 3 x USB 2.0 Headers 5 x Fan Headers 1 x FireWire Header 1 x TPM Module connector Power/Reset Buttons OC Genie Button Multi-BIOS Switch Two-Digit LED Debug Voltage Check Points |
| Power Connectors |
1 x 24-pin ATX Power Connector 1 x 8-pin CPU Power Connector |
| Fan Headers |
1 x CPU (4-pin) 4 x SYS (2 x 4-pin, 2 x 3-pin) |
| IO Panel |
1 x Combination PS/2 Port 2 x USB 2.0 (Gaming Port enabled) SPDIF Outputs 2 x USB 2.0 2 x USB 3.0 1 x Qualcomm Atheros Killer E2205 NIC HDMI VGA DVI-D Audio Jacks |
| Warranty Period | 3 Years |
| Product Page | Link |
The main competition MSI has with the gaming will be with its own Z77A-GD65, followed by other gaming products like the ASRock Fatal1ty Z77, the ASUS ROG MVG and the Gigabyte G1.Sniper M3. Compared to the Z77A-GD65, as mentioned previously, asides from the new skin on the software the hardware upgrades are limited to the Killer NIC and the Gaming Ports, so I would not be surprised if the Gaming edition is eating sales away from the regular GD65. The nearest ATX gaming product in terms of price is the ASRock Fatal1ty Z77 Professional at $195 which we reviewed back in May 2012. The extra price difference means the Fatal1ty had more SATA ports, an IDE connector, a Floppy connector, dual NICs, four more USB 3.0 ports, and a couple of PCI slots instead of x1 PCIe. Both lack a gaming focused audio setup however.
MSI Z77A-GD65 Gaming BIOS
I enjoy good BIOS design – a system that is both easy to navigate but also nice to look at covers two of the bases by which I judge a BIOS. The MSI graphical BIOS implementation was visually a breath of fresh air when it was released, but was starting to look dated. It had a good system of informing the users of the system underneath, but the myriad of options to select followed no specific pattern, especially when it came to overclocking.
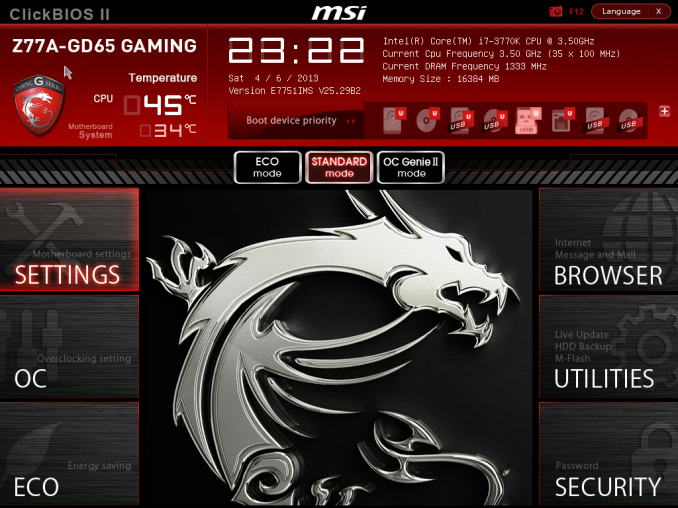
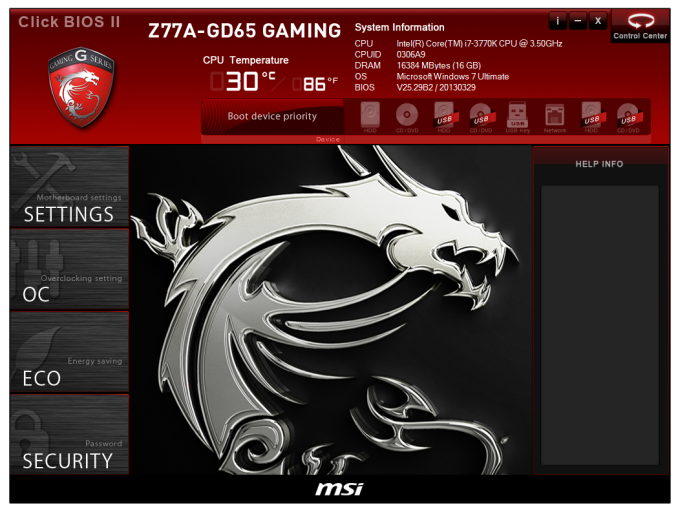
With the new gaming range of motherboards comes a new look BIOS. Unfortunately, the look is all that has changed – the functionality is still leaving elements to be desired. The new look means dragons:
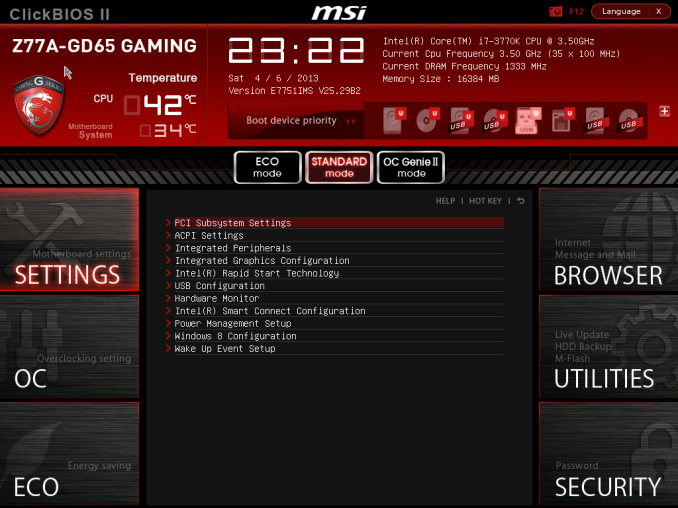
Our front screen not only looks good but contains vital information that many other manufacturers fail to deliver. Right from the word go we know what motherboard we are dealing with, what BIOS version it is, what CPU is installed, what overclock we are running, and how much memory is present. For added measure, the CPU and chipset temperatures are also given. All that is missing is perhaps a fan speed indicator for the CPU fan, or the CPU voltage, then all would be well. I am infuriated with motherboards that do not tell me what they are or what the system I am dealing with is at the start – I enjoy having this information on every single page as a constant banner. MSI has got this right.
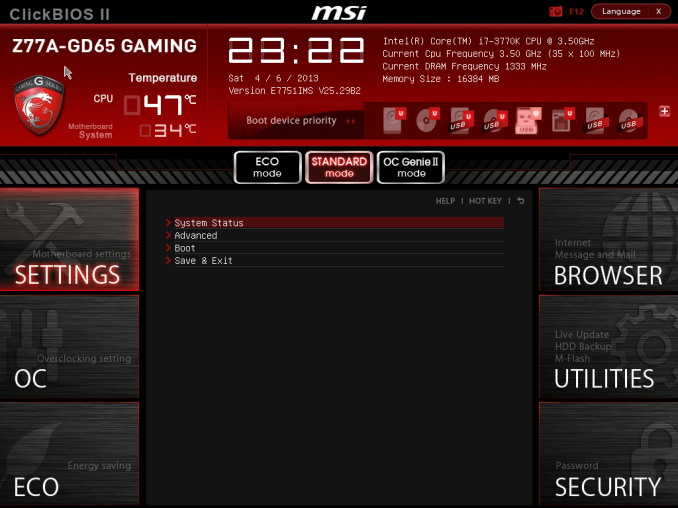
Unfortunately the good stuff stops here – the option selection from MSI needs a big change in both ease of use and information. We can select one of the six options around the dragon for additional menus, such as that for Settings:
Users new to BIOSes will not know what these options are, and the BIOS does not even try to help new users understand. Moving through to the Advanced Menu gives the actual bulk of the BIOS options:
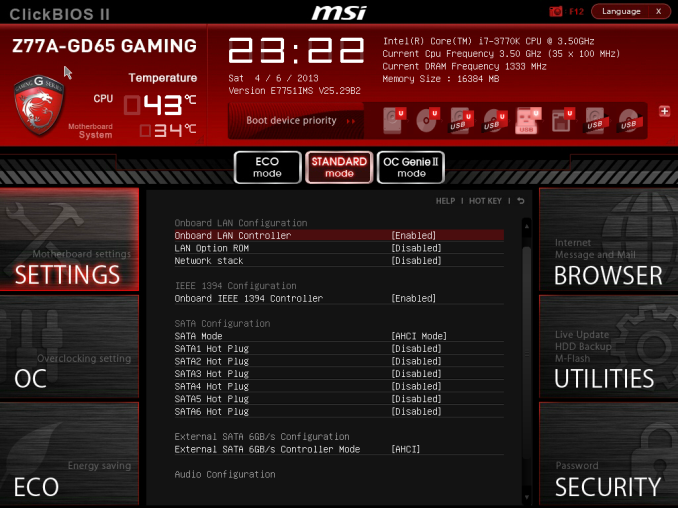
Ask a new user what ACPI or Rapid Start is, and they will not have a clue. Also somewhat frustrating is that without actually going into the menus, we cannot tell where the SATA configuration modes are, or how to enable Firewire/network ports. These are hidden in the Integrated Peripheral menu:
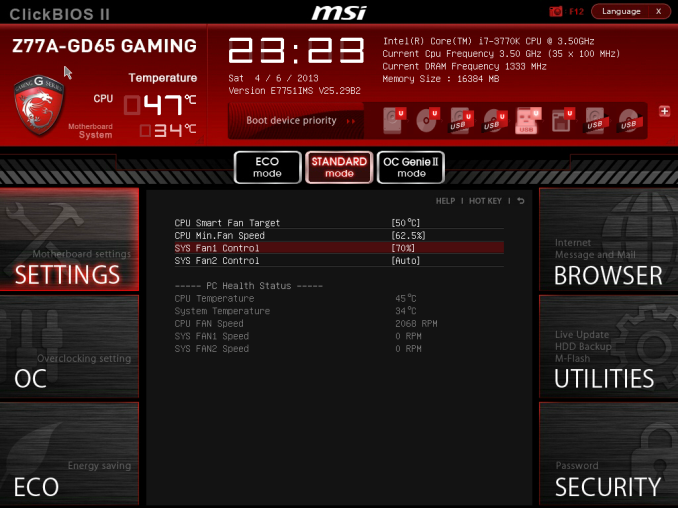
Aside from the glaring error in this menu (“External SATA Configuration” is not external, it is the internal ASMedia controller), I am at least glad that AHCI is enabled by default. Elsewhere in the Advanced menu options are our BIOS fan controls under Hardware Monitor. The fan controls in the BIOS are pretty poor, offering only a ‘Smart Fan’ target for the CPU header and pure % options for the two 4-pin SYS fan headers:
The OS software gives better fan controls, but MSI are making the BIOS options too quick and dirty for my liking. These BIOS options also undermine the actual way that fans work, by assuming that power applied is directly proportional to the fan speed, then offering the fan speed as an option when the BIOS only deals with the power applied. I have ranted quite fervently in the past, on both the Gigabyte Z77X-UP7 and ASUS Maximus V Formula review and will not mention it here for the sake of not sounding like a broken record.
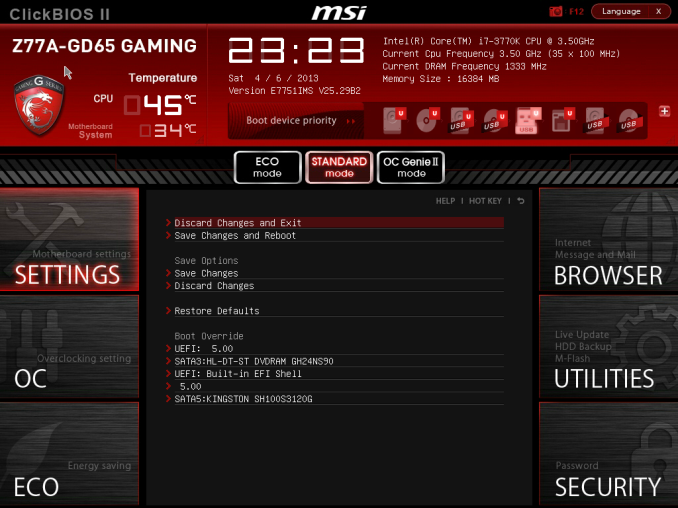
Elsewhere in the Advanced menu is the Windows 8 Fast Boot options, and back out in Settings are our boot configuration. MSI also offers a Boot Override, allowing a single device to have boot priority on the next boot only – good for OS installs, though the option is too hidden away in menus for my liking.
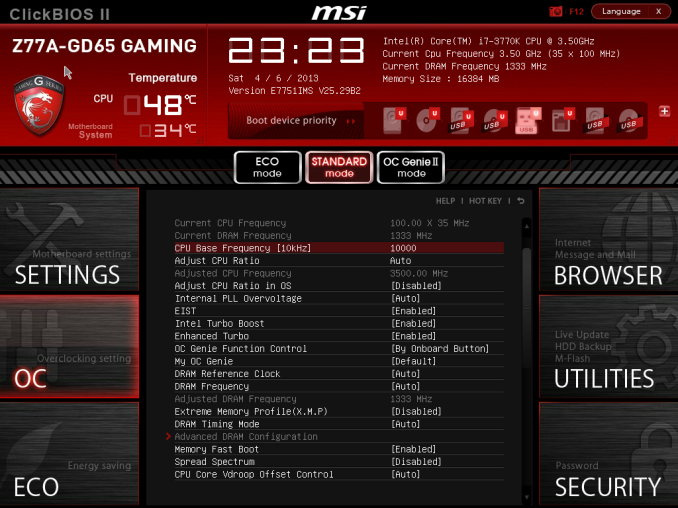
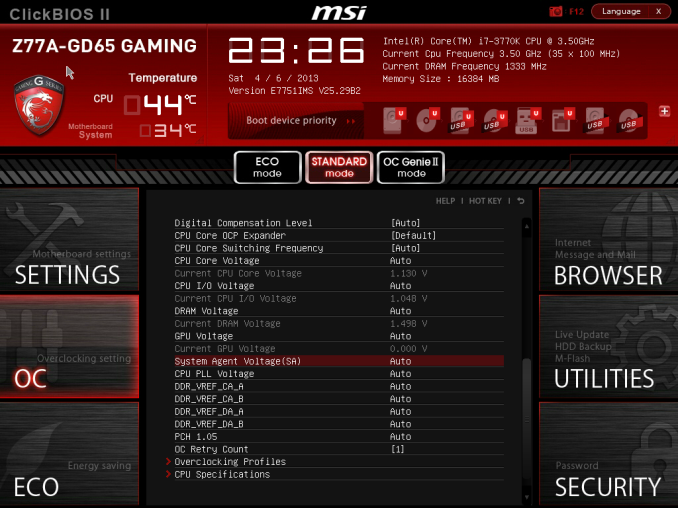
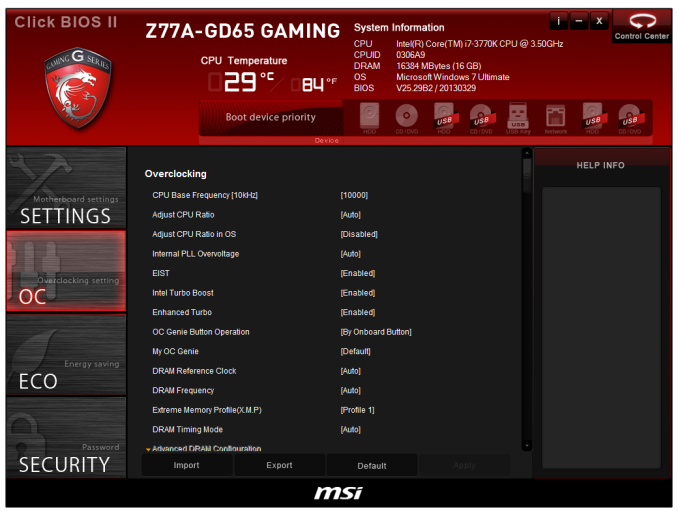
The overclock options is where most people will head and I am aghast with the disorganized nature of how MSI present them. Take a look for yourself:
There is no segregation between CPU options, memory options, voltage options, or any sense of order. It seems like the BIOS engineer just decided to shake options in a bag and put them in as they came out, lottery style. We get a basic CPU BCLK/multiplier option at top, along with Turbo options then memory. XMP on our kit works fine, although at 2400 C10 the system did not like S3 sleep modes that often. MSI also repeat their utterly confusing options relating to ‘Digital Compensation’ without a whiff of actually explaining what the option does, and then offer a series of voltages with no indication of what the safe values are. Users are also limited to absolute voltage values rather than a choice of an offset, and no automatic overclock options are offered beyond OC Genie.
Elsewhere in the BIOS are options to disable the Phase LEDs, update the BIOS via M-Flash (make sure your USB stick is valid), overclocking profile saving and CPU feature analysis. Adventurous users can play with winki, an MSI Linux install that allows users to access the browser through the BIOS.
MSI Z77A-GD65 Gaming Software
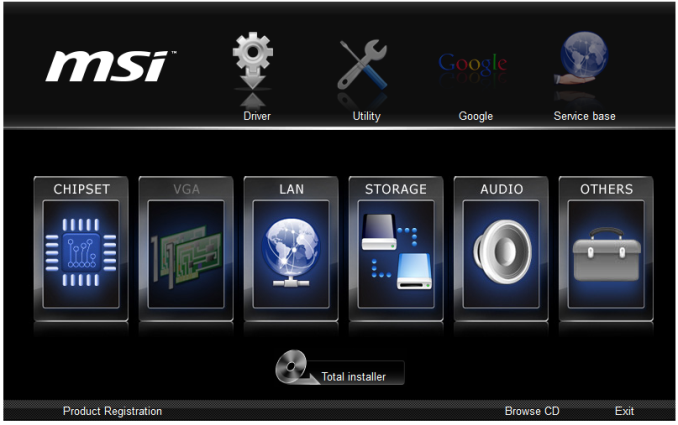
Along with the BIOS, the software packaged with the Z77A-GD65 Gaming also gets a visual make over, at least in terms of Click BIOS II and Control Center, like the Z77 MPower series did in our review of the Z77 MPower. The first element of the software to tackle though is the installation CD.
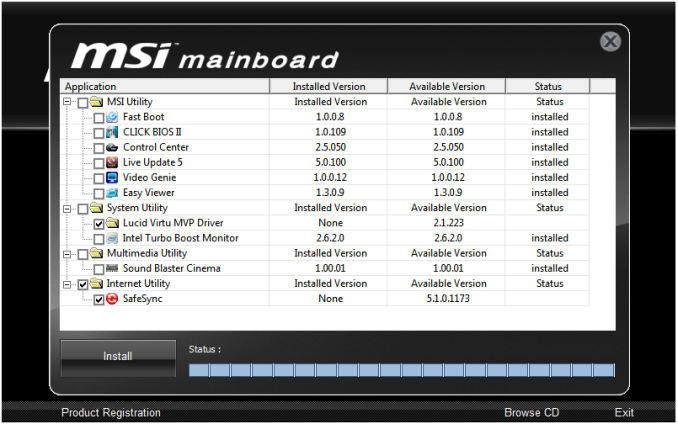
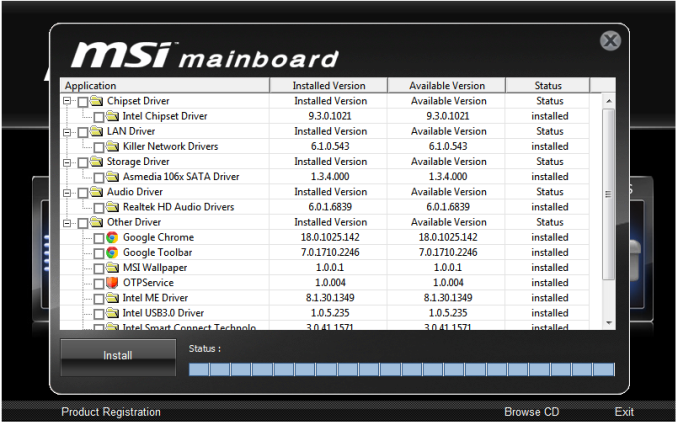
The installation CD is straight forward, with one tab for drivers and the other for software. Each page offers a ‘Total Installer’ button, which brings up a selectable list of options for you to deselect:
The main software packages to be installed are Click BIOS II, Control Center, Audio Genie, Easy Viewer, Fast Boot, Live Update 5, MSI Suite and Killer Network Manager.
Click BIOS II
In the name of consistency, MSI want to bring BIOS options to the user without the user having to actually go into the BIOS. Click BIOS II is the software to do the job, and it does indeed look like the BIOS, except this time we get a ‘Help Info’ screen such that the options are described (although not as much as ASRock actually do in their actual BIOS).
Unfortunately while the initial visual is good, I think MSI have failed on the actual font and layout of the options. As I mentioned in the BIOS itself, many of the options feel haphazardly placed, especially in the OC menu. It does not help that in Click BIOS II the font used feels bulky with lots of gaps between the options and no real careful thought to presentation beyond the big logo.
Using the button on the top right, we can go straight into Control Center.
ControlCenter
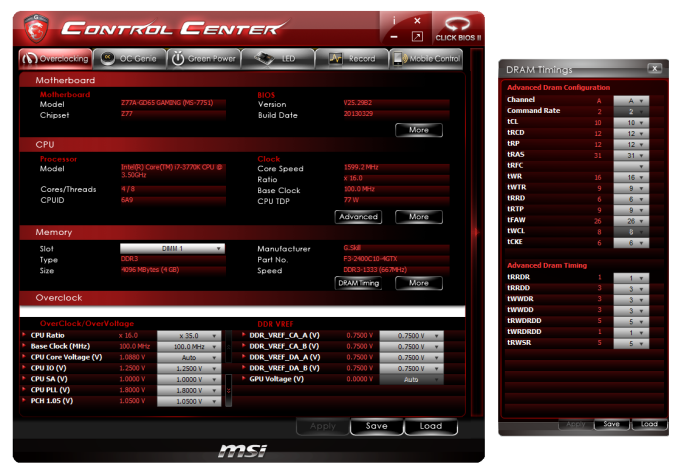
The main hub of options in the MSI software package is here. Control Center has different color packages depending on which motherboard you are dealing with – blue for mainstream, yellow for MPower, and now red for Gaming. This style of red text on dark red background is not the easiest for partially colorblinded folk like me to read, but options are here for overclocks, OC Genie, Power Saving and recording data.
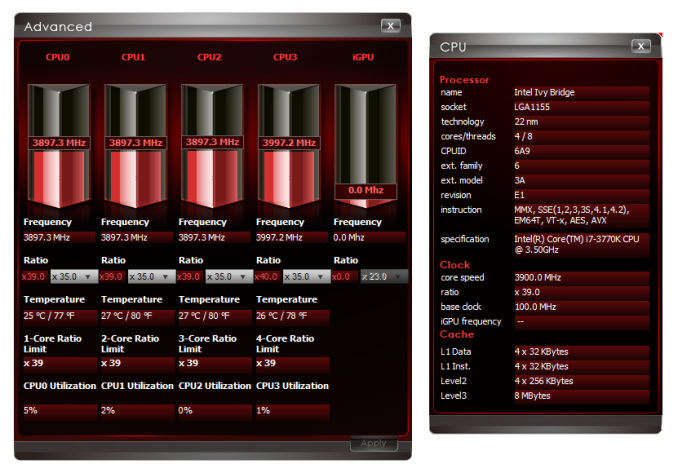
The overclocking screen gives all the board information, more so than the BIOS, as well as pull-down menus for ratios and voltages. Unfortunately there are no options to actually type in the values, which is something that a true overclocker would want to have. Scrolling through to 1.65 volts starting at Auto and stepping through in 0.0125 volt increments is not the most fun task in the world. The overclocking screen also gives access to advanced CPU and memory options, such as sub-timings. Although I should point out that the ‘More’ option for memory failed to work in my setup, causing Control Center to crash spectacularly.
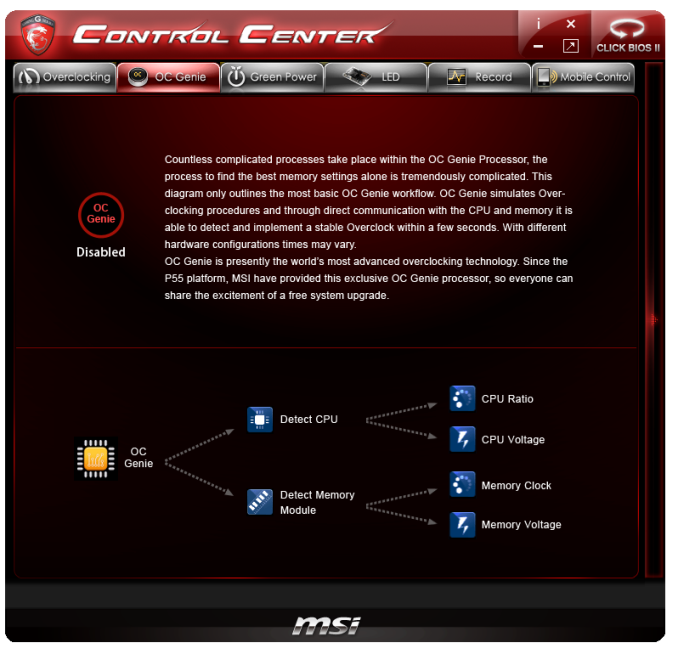
The OC Genie section next is a simple one-button ‘time to overclock the system’ type arrangement, similar to pressing the button on the motherboard. Our testing of the OC Genie is in the overclocking section of this review.
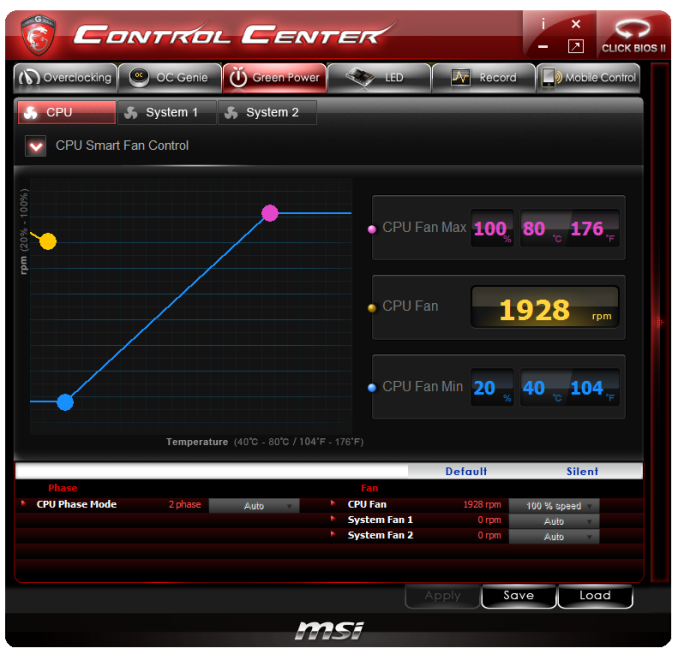
Under the banner Green Power we find our fan controls. As the board has three 4-pin fan headers, these are what we can control in the software. While the visual representation of the fan profile looks nice, MSI are wide of the mark in terms of what fan controls should actually be and do. At no point does it test the fan to see its power to RPM profile, and it tries to allow the user to control the RPM of the fan on a linear graphical scale without doing the conversion. Manufacturer software engineers need to understand the usefulness of what a black-box style type of software can do in the fan situation, then actually program one, rather than tossing out something that looks ok.
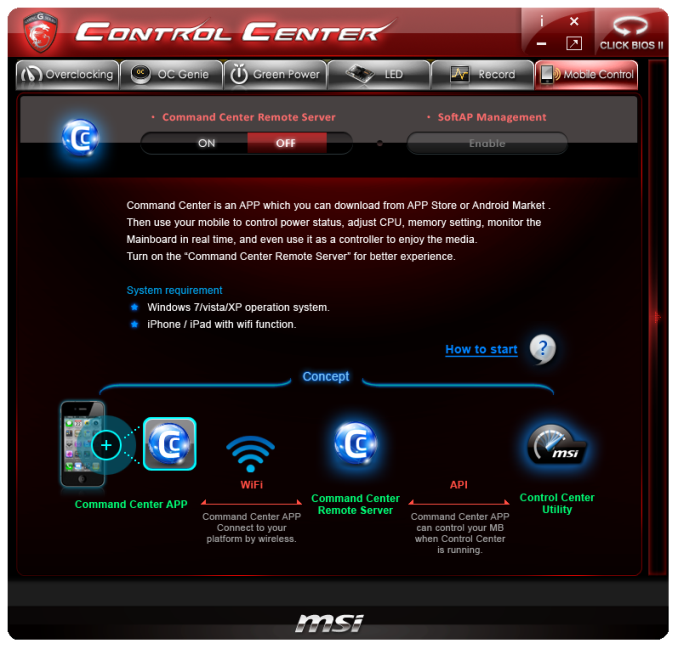
MSI also offers a mobile control app for smartphones that allows users to monitor temperatures and adjust a few overclock settings with the smartphone rather than through the Control Center software. I always have bad luck with smartphone apps interfacing with my hardware due to my odd ICS home internet setup, so they never work for me, but it is there if you can work it.
Fast Boot / Go2BIOS
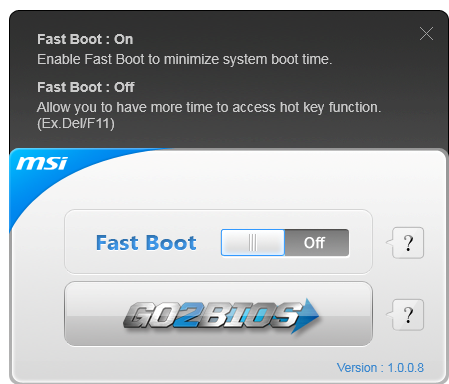
Does what it says on the tin – Fast Boot attempts to optimize the system boot up sequence so Windows loads faster (although it had only a small affect for my setup), and Go2BIOS is a one button click that will restart the system straight into the BIOS.
Live Update 5
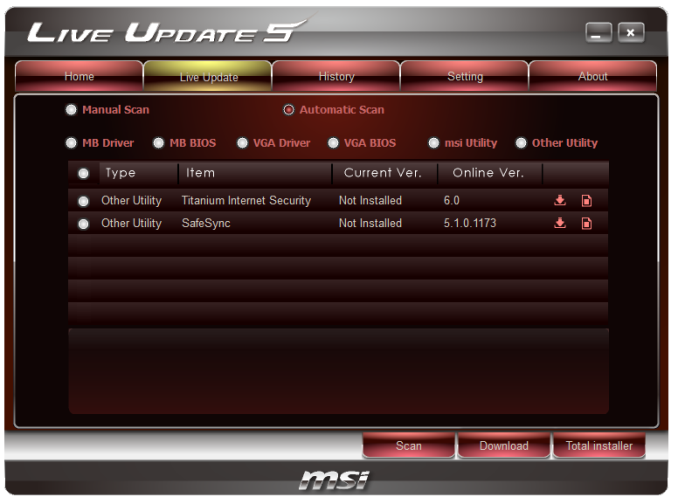
The crown in MSI’s software stack is Live Update 5 – the one-stop shop for all your software upgrading needs. Live Update 5 will contact the MSI server, tell it what board you have and download a list of the latest software and drivers (BIOS too). It will cross-reference that with what you have on the system, and then if there is a newer version on the server, let you download and install it. Or, you can let the software download and install it all for you. No-one else in the motherboard industry comes close to doing something like this, and it should have been part of the package years ago.
If I was to have a gripe about the software, it is that it does not tell you how big the update is before you download it. It tells you as it is downloading the update, but for users on limited bandwidth, perhaps downloading 140MB of audio drivers is not the best way to do things, especially if it does not download properly and has to be downloaded again.
Qualcomm Atheros Killer Network Manager
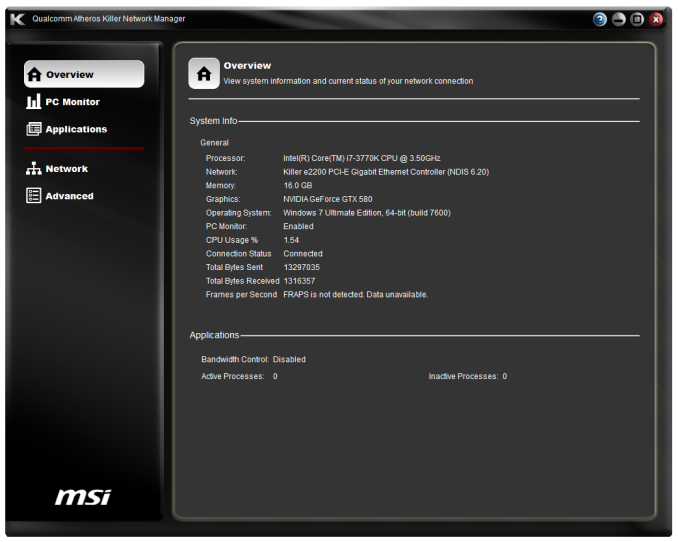
Many software packages with motherboards come with an element of network control, allowing users to prioritize traffic over more important protocols or from more important sources. The backbone of the software is usually cFos, a program developed by a third party but applicable to any network setup by virtue of a slightly increased CPU load. In an effort to reduce CPU load (i.e not to implement high power turbo states when idle), network controllers exist that perform the tasks on the controller rather than the CPU – this requires a link between the software you see in the OS and the controller itself. Intel controllers are often cited as having good control and lower CPU usage than Realtek, but the Killer chip from Atheros (now Qualcomm Atheros) is one aimed at the gaming segment.
The Killer NICs are a vital part of MSI’s gaming range laptops, and are making the jump into their motherboards (note the Gigabyte G1.Sniper 3 has a Killer NIC as well). Alongside all the features managed by cFos via software, the Killer ecosystem is designed for the important data to bypass the Windows network queue and be sent at a lower latency.
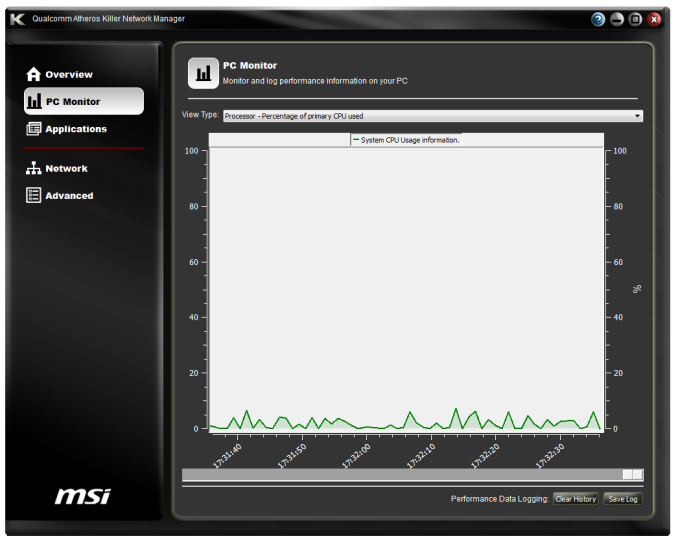
The Killer software is easy to navigate through and offers several neat features like monitoring CPU usage as shown above. However the cFos software on other platforms offers a wider variation of options and management, albeit at the expense of CPU cycles (and possibly FPS).
MSI Suite
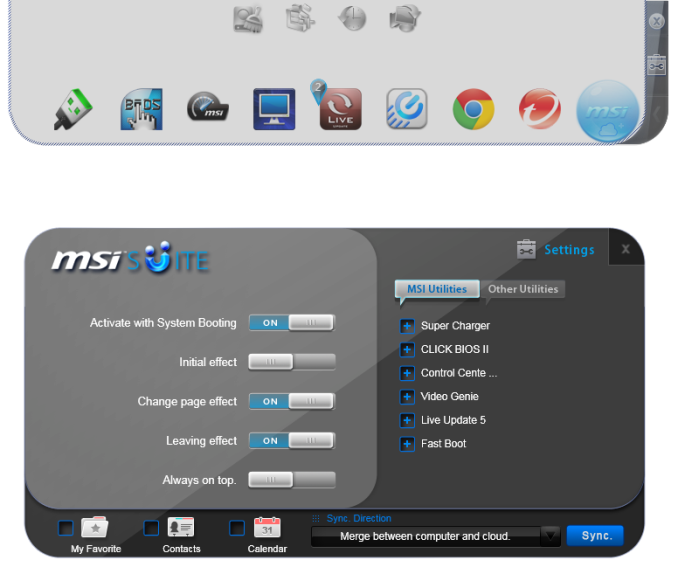
The majority of MSI’s software package is delivered in MSI Suite, a drop down icon based menu system present on the desktop. After installation, it will offer a small blue semi-circle which pulls down a series of icons related to MSI software. Certain software, such as Live Update, will also pop up and let the user know if an update is available.
The options menu allows the user to maintain setting consistency across multiple machines, as well as adding other utilities aside from those specified by MSI. It is worth nothing that MSI has to be disabled in order to enable SLI for the first time.
MSI Z77A-GD65 Gaming In The Box
Products aimed at the gaming crowd are draped in PR and have to be visually striking. Along with this should be a sense that the gamer is being looked after, and that they are getting more for their money, in terms of features and support. So when you offer access to specific forums and support admins when something goes wrong, that is great – but also there is an element of camaraderie for competitions between other brands. Part of the way to gain this mindset is to give more stuff to the user, either free or with what they purchase. As part of a gaming product, I would want extras themed in the overall style, but not too cheesy.
In the Z77A-GD65 Gaming, we have:
User Guide
Installation Guide
Driver CD
MSI Gaming Door Sign
Four SATA Cables
Rear IO Shield
Flexi-SLI Connector
Voltage Read-point attachments
M-Connectors
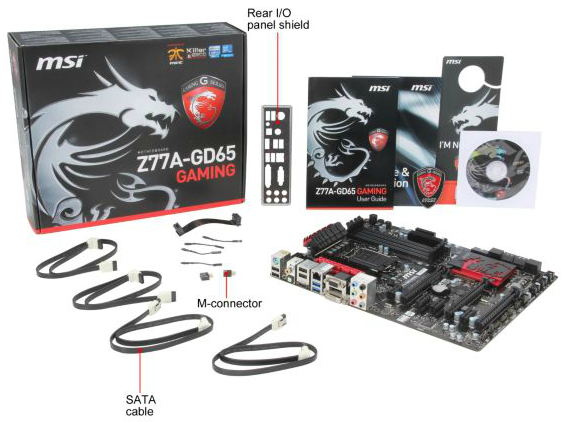
Even though we are dealing with a sub $200 motherboard, the kit in the GD65 Gaming is incredibly light. By virtue of not having an extra USB 3.0 port on board we do not get an extra USB 3.0 panel included, like on the Gigabyte Z77X-UD5H. Back in the review of the UD5H I criticized it for not having a rigid SLI connector, and I could say the same for the MSI here, but various MSI GPUs have heatpipes that block rigid connectors, so a flexi-connector makes sense.
MSI Z77A-GD65 Gaming Overclocking
Note: Ivy Bridge does not overclock like Sandy Bridge. For a detailed report on the effect of voltage on Ivy Bridge (and thus temperatures and power draw), please read Undervolting and Overclocking on Ivy Bridge.
Experience with MSI Z77A-GD65 Gaming
The MSI overclocking experience is always a little odd. As a general rule they have one automatic setting (which either does or does not work) and the manual settings are either a gamble in the OS or a mire in the BIOS. The GD65-Gaming fits into this rule, and I have a feeling that all MSI motherboards will fit into this rule until the BIOS is organized or more automatic overclocking options are offered. ASUS offers 3-4, Gigabyte offer 3-4, ASRock offers 6-10, MSI offers one – that is a big discrepancy.
Our overclocking experience with the Gaming was a little crazy. For various reasons we are using a new i7-3770K CPU, and the performance of this CPU seems to be very poor, failing to hit even 4.5 GHz on the Z77A-GD65 Gaming. This could be either CPU or BIOS issues. Nevertheless, our overclocking experiences are detailed below.
Methodology:
Our standard overclocking methodology is as follows. We select the automatic overclock options and test for stability with PovRay and OCCT to simulate high-end workloads. These stability tests aim to catch any immediate causes for memory or CPU errors.
For manual overclocks, based on the information gathered from previous testing, starts off at a nominal voltage and CPU multiplier, and the multiplier is increased until the stability tests are failed. The CPU voltage is increased gradually until the stability tests are passed, and the process repeated until the motherboard reduces the multiplier automatically (due to safety protocol) or the CPU temperature reaches a stupidly high level (100ºC+). Our test bed is not in a case, which should push overclocks higher with fresher (cooler) air.
Automatic Overclock:
Automatic overclock options come from OC Genie, which is enabled either via the Control Center (in OS), in the BIOS (OC Genie mode), or phyiscally with the button. Unfortunately each one provides different results.
The OC Genie via Control Center method applied a 4.2 GHz overclock on all cores as well as jumping the memory to XMP but back a strap (2133 instead of 2400). In this mode we recorded a load voltage of 1.256 volts in the OS, a peak temperature of 81C during OCCT and a score of 1530.96 in PovRay.
The OC Genie Mode via the BIOS was fairly basic, applying only MultiCore Turbo (39x on all cores), and did not touch the memory. This gave a load voltage of 1.256 volts, a peak temperature of 75C during OCCT and a score of 1421.96 in PovRay.
The last method, physically depressing the button, reacted similarly to the Control Center method, giving a 4.2 GHz overclock on all cores and a memory bump. Load voltage was registered as 1.248 volts, giving a peak temperature of 83C and a score of 1535.10 in PovRay.
Manual Overclock:
Here's where things get a little interesting. For various reasons, we are using an untested, different 3770K CPU to previous reviews. Normally I would start this testing at 4.4 GHz and 1.1 volts, something the three 3770K CPUs that have crossed my path (only one for reviewing) over the past 12 months have all done. In a real world situation explaining how varied CPUs are, this CPU, in the GD65 Gaming, behaved very different. In fact, we had to start at 4.0 GHz at 1.1 volts, then perform our normal testing. The results are as follows.
For 4.0 GHz (40x100), we needed 1.100 volts in the BIOS which gave 1.088 volts at load. OCCT gave 62C and PovRay scored 1465.55.
For 4.1 GHz (41x100), we needed 1.125 volts in the BIOS which gave 1.112 volts at load. OCCT gave 66C and PovRay scored 1497.88.
For 4.2 GHz (42x100), we needed 1.175 volts in the BIOS which gave 1.160 volts at load. OCCT gave 68C and PovRay scored 1527.51.
For 4.3 GHz (43x100), we needed 1.225 volts in the BIOS which gave 1.216 volts at load. OCCT gave 70C and PovRay scored 1575.73.
For 4.4 GHz (44x100), we needed 1.300 volts in the BIOS which gave 1.288 volts at load. OCCT gave 81C and PovRay scored 1603.28.
4.5 GHz was not stable - at 1.325 volts the CPU was reaching 95C during PovRay, getting very hot very quickly. I was unwilling to push it any further.
Many thanks to...
We must thank the following companies for kindly providing hardware for our test beds:
Thank you to OCZ for providing us with the 1250W Gold Power Supply and USB testing SSD.
Thank you to Micron for providing us with the SATA testing SSD.
Thank you to G.Skill for providing us with the memory kits.
Thank you to ASUS for providing us with the AMD GPUs and some IO Testing kit.
Thank you to ECS for providing us with the NVIDIA GPUs.
Thank you to Corsair for providing us with the Corsair H80i CLC.
Thank you to Rosewill for providing us with the 500W Platinum Power Supply for mITX testing.
Test Setup
Power Consumption
Power consumption was tested on the system as a whole with a wall meter connected to the OCZ 1250W power supply, while in a dual 7970 GPU configuration. This power supply is Gold rated, and as I am in the UK on a 230-240 V supply, leads to ~75% efficiency > 50W, and 90%+ efficiency at 250W, which is suitable for both idle and multi-GPU loading. This method of power reading allows us to compare the power management of the UEFI and the board to supply components with power under load, and includes typical PSU losses due to efficiency. These are the real world values that consumers may expect from a typical system (minus the monitor) using this motherboard.
While this method of power measurement may not be ideal, and you feel these numbers are not representative due to the high wattage power supply being used (we use the same PSU to remain consistent over a series of reviews, and the fact that some boards on our test bed get tested with three or four high powered GPUs), the important point to take away is the relationship between the numbers. These boards are all under the same conditions, and thus the differences between them should be easy to spot.

MSI motherboards have typically been good with idle power consumption, and the GD65 Gaming reflects this. Metro2033 power consumption is higher than expected, but definitely not in the realm of the high end enthusiast ranges.
Windows 7 POST Time
Different motherboards have different POST sequences before an operating system is initialized. A lot of this is dependent on the board itself, and POST boot time is determined by the controllers on board (and the sequence of how those extras are organized). As part of our testing, we are now going to look at the POST Boot Time - this is the time from pressing the ON button on the computer to when Windows starts loading. (We discount Windows loading as it is highly variable given Windows specific features.) These results are subject to human error, so please allow +/- 1 second in these results.
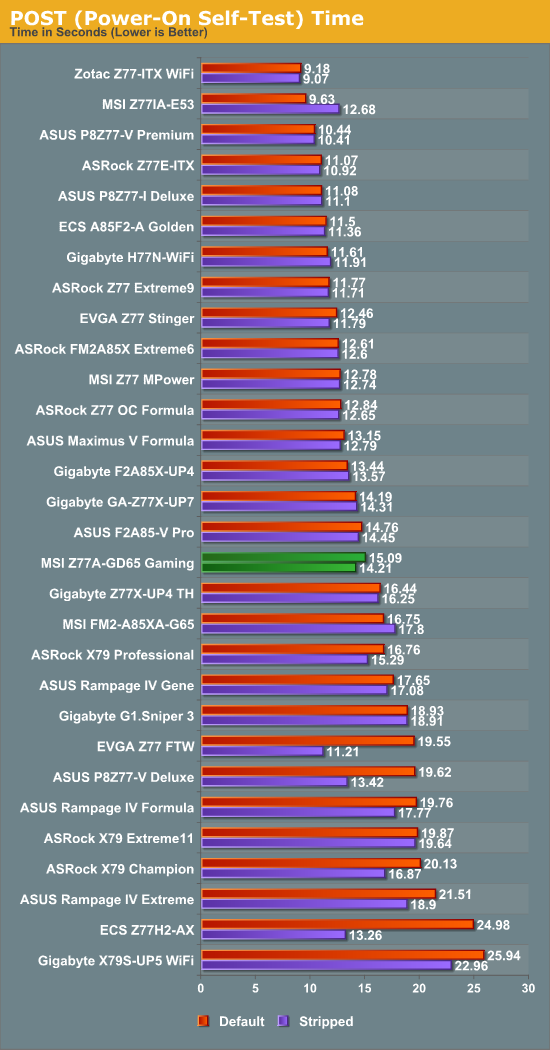
For whatever reason the Z77A-GD65 Gaming was not too quick with Windows 7 POST times, with over 15 seconds from power to Windows loading. I noticed that between the MSI BIOS image being shown and the Windows loading there was a period where my monitor would flicker on and off twice before focusing on the loading animation. Ideally I would like to see POST times south of 12 seconds when two GPUs are fitted.
Rightmark Audio Analyzer 6.2.5
In part due to reader requests, we are pleased to include Rightmark Audio Analyzer results in our benchmark suite. The premise behind Rightmark:AA is to test the input and output of the audio system to determine noise levels, range, harmonic distortion, stereo crosstalk and so forth. Rightmark:AA should indicate how well the sound system is built and isolated from electrical interference (either internally or externally). For this test we connect the Line Out to the Line In using a short six inch 3.5mm to 3.5mm high-quality jack, turn the OS volume to 100%, and run the Rightmark default test suite at 48 kHz, 96 kHz and 192 kHz. We look specifically at the Dynamic Range of the audio codec used on board, as well as the Total Harmonic Distortion + Noise.
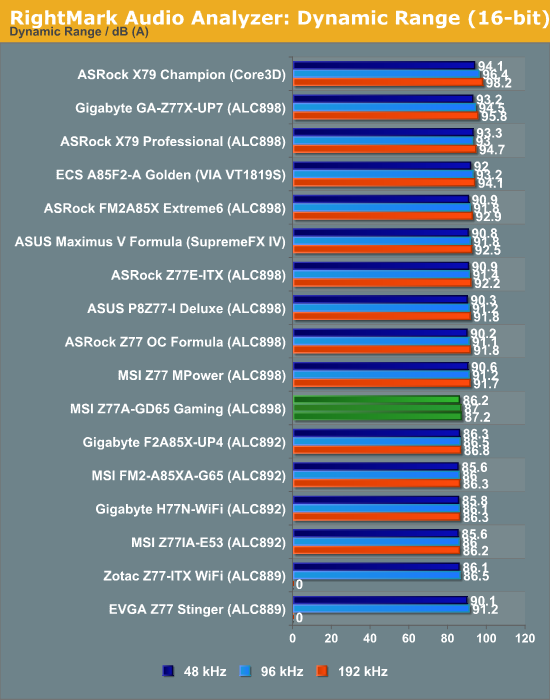
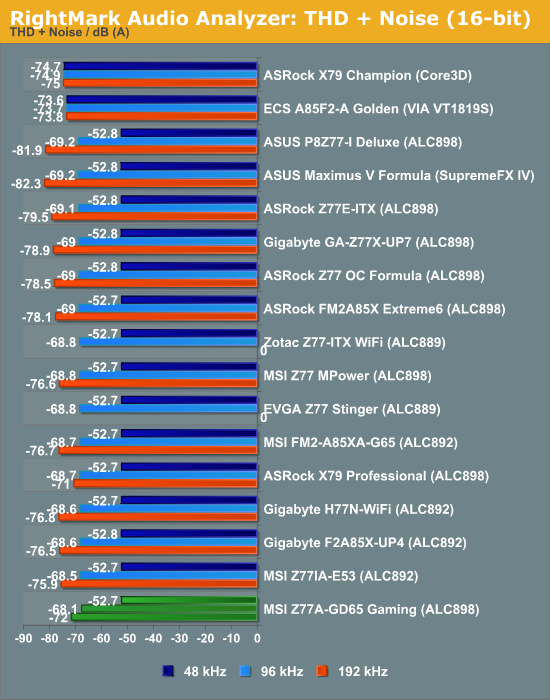
For an ALC898 chip on a gaming motherboard, the audio solution performs quite poorly. Initially my test had interchannel leakage, caused by SoundBlaster being enabled. While disabling this improved the test, the final results are a bit of a shock, being down in output and distortion compared to the competition.
USB 3.0 Backup
For this benchmark, we run CrystalDiskMark to determine the ideal sequential read and write speeds for the USB port using our 240 GB OCZ Vertex3 SSD with a SATA 6 Gbps to USB 3.0 converter. Then we transfer a set size of files from the SSD to the USB drive using DiskBench, which monitors the time taken to transfer. The files transferred are a 1.52 GB set of 2867 files across 320 folders – 95% of these files are small typical website files, and the rest (90% of the size) are the videos used in the WinRAR test.
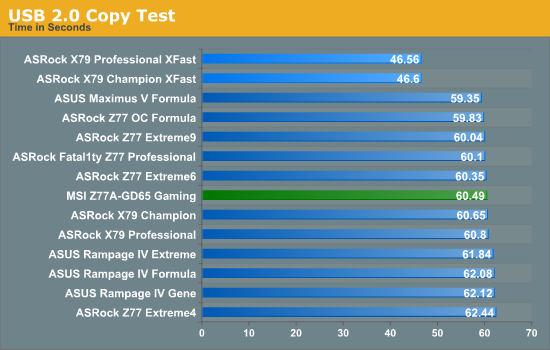
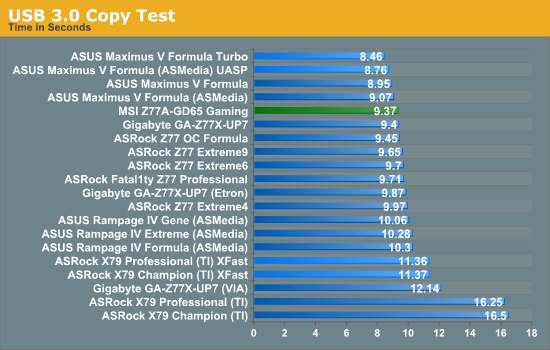
MSI does well in terms of absolute USB 3.0 speed, although we have no extra controllers to compare. It happily makes a change from older MSI models that were ~20% slower in USB 2.0.
DPC Latency
Deferred Procedure Call latency is a way in which Windows handles interrupt servicing. In order to wait for a processor to acknowledge the request, the system will queue all interrupt requests by priority. Critical interrupts will be handled as soon as possible, whereas lesser priority requests, such as audio, will be further down the line. So if the audio device requires data, it will have to wait until the request is processed before the buffer is filled. If the device drivers of higher priority components in a system are poorly implemented, this can cause delays in request scheduling and process time, resulting in an empty audio buffer – this leads to characteristic audible pauses, pops and clicks. Having a bigger buffer and correctly implemented system drivers obviously helps in this regard. The DPC latency checker measures how much time is processing DPCs from driver invocation – the lower the value will result in better audio transfer at smaller buffer sizes. Results are measured in microseconds and taken as the peak latency while cycling through a series of short HD videos - under 500 microseconds usually gets the green light, but the lower the better.
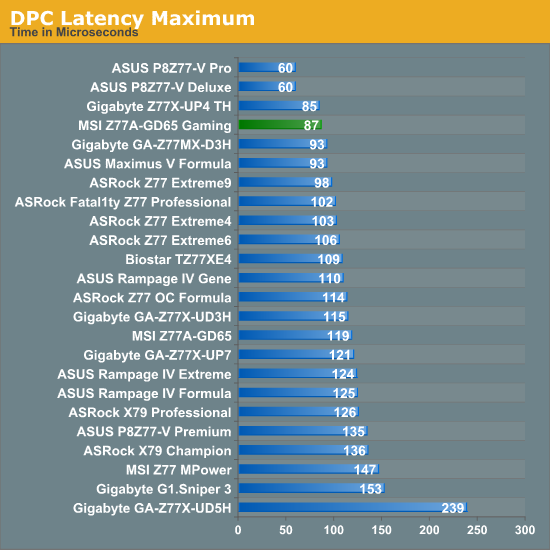
The MSI DPC results are great, coming in under 200 microseconds easily. While during our test it hit a peak of 87, I noticed that when network activity was going on (I accidentally left Google Drive enabled) this would raise the DPC maximum to 178, which is still quite good.
Readers of our motherboard review section will have noted the trend in modern motherboards to implement a form of MultiCore Enhancement / Acceleration / Turbo (read our report here) on their motherboards. This does several things – better benchmark results at stock settings (not entirely needed if overclocking is an end-user goal), at the expense of heat and temperature, but also gives in essence an automatic overclock which may be against what the user wants. Our testing methodology is ‘out-of-the-box’, with the latest public BIOS installed and XMP enabled, and thus subject to the whims of this feature. It is ultimately up to the motherboard manufacturer to take this risk – and manufacturers taking risks in the setup is something they do on every product (think C-state settings, USB priority, DPC Latency / monitoring priority, memory subtimings at JEDEC). Processor speed change is part of that risk which is clearly visible, and ultimately if no overclocking is planned, some motherboards will affect how fast that shiny new processor goes and can be an important factor in the purchase.
For reference, the MSI Z77A-GD65 Gaming does enable a form of MCT at stock settings.
3D Movement Algorithm Test
The algorithms in 3DPM employ both uniform random number generation or normal distribution random number generation, and vary in various amounts of trigonometric operations, conditional statements, generation and rejection, fused operations, etc. The benchmark runs through six algorithms for a specified number of particles and steps, and calculates the speed of each algorithm, then sums them all for a final score. This is an example of a real world situation that a computational scientist may find themselves in, rather than a pure synthetic benchmark. The benchmark is also parallel between particles simulated, and we test the single thread performance as well as the multi-threaded performance.
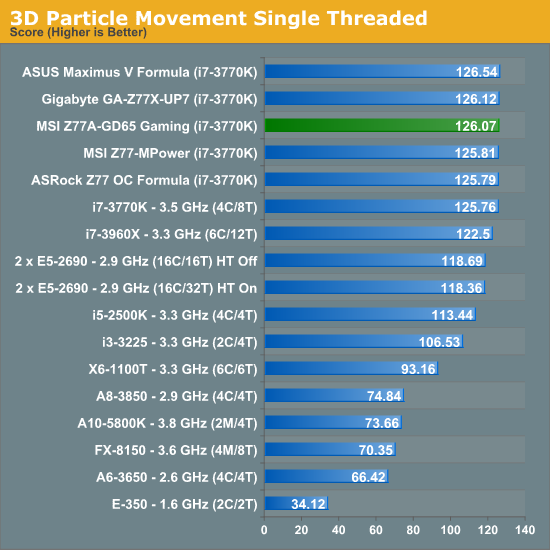
With MCT enabled, the GD65 Gaming hits 3DPM Single Threaded in the middle of the pack at a score of 126.
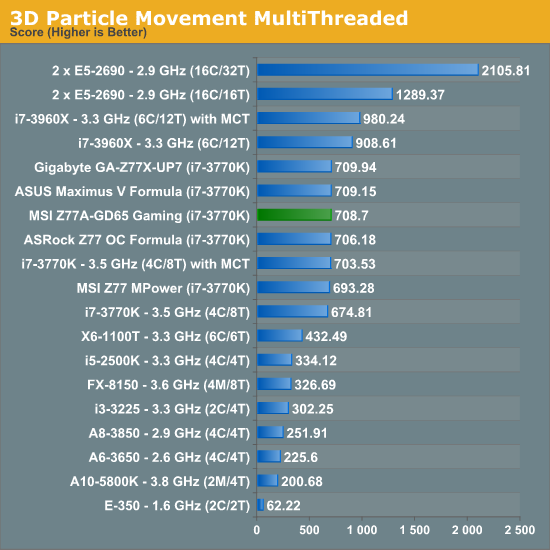
The GD65 Gaming performs well in 3DPM Multithreaded, almost approaching efficiencies seen on the high end ASUS and Gigabyte motherboards.
WinRAR x64 3.93 - link
With 64-bit WinRAR, we compress the set of files used in the USB speed tests. WinRAR x64 3.93 attempts to use multithreading when possible, and provides as a good test for when a system has variable threaded load. If a system has multiple speeds to invoke at different loading, the switching between those speeds will determine how well the system will do.
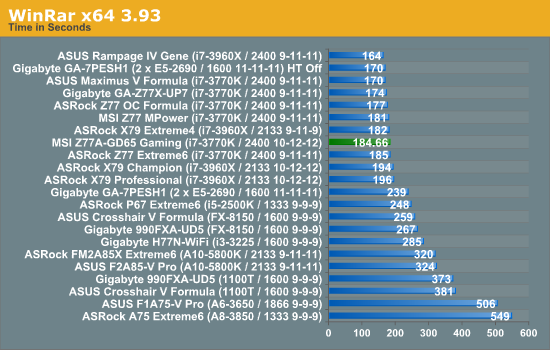
Unfortunately that efficiency in 3DPM is not seen that much in WinRAR, although 184 seconds is no slouch.
Please note we will be updating to WinRAR 4.2 for Haswell. The GD65 Gaming scored 49.65 seconds with v4.2.
FastStone Image Viewer 4.2 - link
FastStone Image Viewer is a free piece of software I have been using for quite a few years now. It allows quick viewing of flat images, as well as resizing, changing color depth, adding simple text or simple filters. It also has a bulk image conversion tool, which we use here. The software currently operates only in single-thread mode, which should change in later versions of the software. For this test, we convert a series of 170 files, of various resolutions, dimensions and types (of a total size of 163MB), all to the .gif format of 640x480 dimensions.
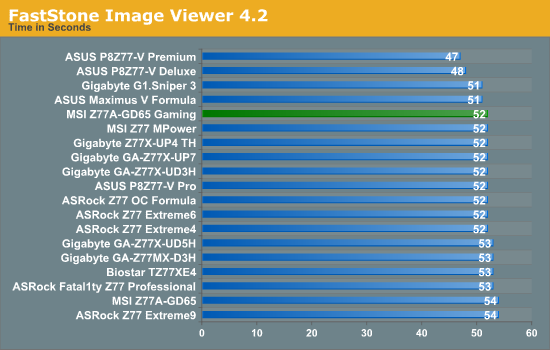
52 seconds is very average for the GD65 Gaming.
Xilisoft Video Converter
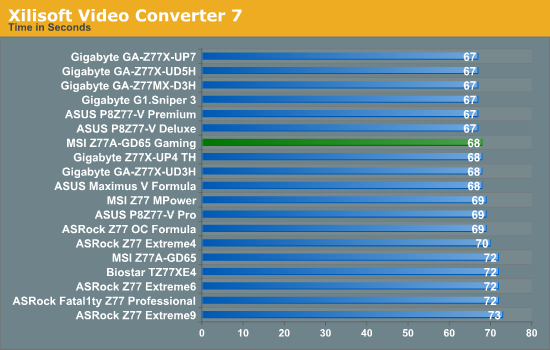
With XVC, users can convert any type of normal video to any compatible format for smartphones, tablets and other devices. By default, it uses all available threads on the system, and in the presence of appropriate graphics cards, can utilize CUDA for NVIDIA GPUs as well as AMD APP for AMD GPUs. For this test, we use a set of 32 HD videos, each lasting 30 seconds, and convert them from 1080p to an iPod H.264 video format using just the CPU. The time taken to convert these videos gives us our result.
x264 HD Benchmark
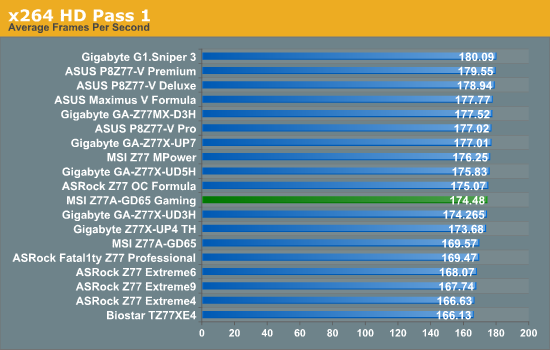
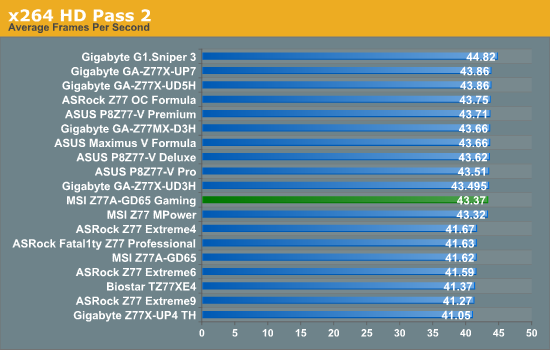
The x264 HD Benchmark uses a common HD encoding tool to process an HD MPEG2 source at 1280x720 at 3963 Kbps. This test represents a standardized result which can be compared across other reviews, and is dependant on both CPU power and memory speed. The benchmark performs a 2-pass encode, and the results shown are the average of each pass performed four times.
Metro2033
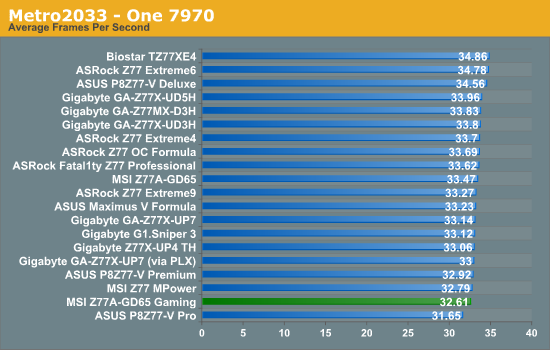
Metro2033 is a DX11 benchmark that challenges every system that tries to run it at any high-end settings. Developed by 4A Games and released in March 2010, we use the inbuilt DirectX 11 Frontline benchmark to test the hardware at 2560x1440 with full graphical settings. Results are given as the average frame rate from 4 runs.
| Metro 2033 | 1 GPU | 2 GPU | 3 GPU |
| AMD | |||
| NVIDIA |
Dirt 3
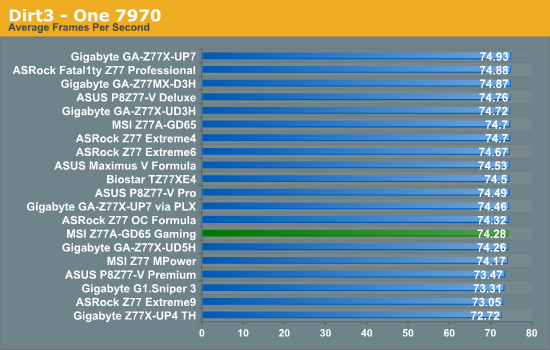
Dirt 3 is a rallying video game and the third in the Dirt series of the Colin McRae Rally series, developed and published by Codemasters. Using the in game benchmark, Dirt 3 is run at 2560x1440 with Ultra graphical settings. Results are reported as the average frame rate across four runs.
| Dirt3 | 1 GPU | 2 GPU | 3 GPU |
| AMD | |||
| NVIDIA |
When a product on the market promotes itself as a gaming tool, it cannot just be part of the name or the branding. The product has to showcase why it is a gaming product, and why it is so deserving of our money above and beyond the standard product grade. Associating the product with professional gamers and marketing strongly are worth nothing if the product itself is a poor shell of what is actually good for gamers. Out with the fluff, in with what the real world needs and wants.
It is hard to judge where the MSI Z77A-GD65 Gaming sits on this proverbial spectrum – in almost every way it is the standard Z77A-GD65. What makes it different is the Killer NIC for reduced lag, the gaming port (that has no associated software to make sure it is enabled), and the dragon styling, covering the shape of the VRM heatsink, the chipset heatsink, the BIOS and various elements of the software stack.
The price for all this benefit over the standard model is $15-$30 (when the GD65 is on sale), which is excruciatingly high considering the standard GD65 can be had at common retailers for only $150. For that extra I would want some extra box bonuses, or additional USB 3.0 controllers, or dual NICs, or WiFi, or anything!
Despite all this, the Gaming variant does a better than average job in our benchmark suite. While it seems very power efficient at idle, it starts to approach the higher end when going all out in our gaming suite; performance is better than average, but nothing spectacular especially if a user plans to overclock. The main plus in MSI’s arsenal is Live Update 5, which is great from the ‘keeping up-to-date’ point of view – but all MSI motherboards have this.
The overclocking options, while numerate, are awkward to work with due to any sense of order. I am a big fan of having an easy one button overclock, but the option of an array of one-button overclock modes should the user want to go further. An auto overclock to 4.2 GHz is rather poor given that almost every 3770K sample should hit 4.4 GHz. Why not have two or three options for those that have compatible processors?
Ultimately the Z77A-GD65 Gaming feels a little rushed and out of place, firstly because MSI was planning to release their first gaming boards with Haswell until the Haswell delay, but also because the Z77A-GD65 exists and offers mostly the same functionality for $15-30 less.
Our best ATX board at $180 has been the Gigabyte Z77X-UD5H (bronze award), which features 10 USB 3.0 ports, an mSATA, dual NIC (Intel+Realtek), an included USB 3.0 bracket, and software that offers more auto-overclock options. Is it worth missing on that for dragon styling and a gaming NIC?

